 Toyota Yaris: If your vehicle will not start
(a) Simple checks
Before making these checks, make sure you have followed the correct starting procedure given in “How to start the engine” in Section 3 and that you have sufficient fuel. If your vehicle is equipped with the engine immobilizer system, also check whether the other keys will start the engine.
If they work, your key may be broken.
Have the key checked at your Toyota dealer. If none of your keys work, there may be a malfunction in the immobilizer system. Call your Toyota dealer. (See “Keys (with engine immobilizer system)”).
If the engine does not turn over or turns over too slowly—
1. Check that the battery terminals are tight and clean.
2. If the battery terminals are connected correctly, switch on the interior light.
3. If the light does not come on, is dim or goes out when the starter is cranked, the battery is discharged. You may try jump starting. See “(c) Jump starting” for further instructions.
If the light comes on and is normal, but the engine still will not start, it needs adjustment or repair. Call a Toyota dealer or qualified repair shop.
NOTICE.
Do not pull- or push-start the vehicle.
It may damage the vehicle or cause a collision when the engine starts. Also the three-way catalytic converter may overheat and become a fire hazard.
If the engine turns over at its normal speed but will not start—
1. Turn the ignition key to “ACC” or “LOCK” and try starting the engine again.
2. If the engine will not start, the engine may be flooded because of repeated cranking. See “(b) Starting a flooded engine” for further instructions.
3. If the engine still will not start, it needs adjustment or repair. Call a Toyota dealer or qualified repair shop.
(b) Starting a flooded engine
If the engine will not start, your engine may be flooded because of repeated cranking.
If this happens, turn the ignition key to “START” with the accelerator pedal fully depressed, and hold the key at this position for about 30 seconds. Then the cranking hold function stops cranking automatically, and you can try starting the engine with your foot off the accelerator pedal.
If the engine does not start, wait a few minutes and try again.
If the engine still will not start, it needs adjustment or repair. Call a Toyota dealer or qualified repair shop for assistance.
(c) Jump starting
To avoid serious personal injury and damage to your vehicle which might result from battery explosion, acid burns, electrical burns, or damaged electronic components, these instructions must be followed precisely.
If you are unsure about how to follow this procedure, we strongly recommend that you seek the help of a competent mechanic or towing service.
CAUTION.
Batteries contain sulfuric acid which is poisonous and corrosive.
Wear protective safety glasses when jump starting, and avoid spilling acid on your skin, clothing, or vehicle.
If you should accidentally get acid on yourself or in your eyes, remove any contaminated clothing and flush the affected area with water immediately.
Then get immediate medical attention. If possible, continue to apply water with a sponge or cloth while en route to the medical office.
The gas normally produced by a battery will explode if a flame or spark is brought near. Use only standardized jumper cables and do not smoke or light a match while jump starting.
NOTICE.
The battery used for boosting must be 12 V. Do not jump start unless you are sure that the booster battery is correct.
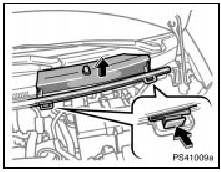
BEFORE JUMP STARTING
Remove the cover as shown in the illustration.
JUMP STARTING PROCEDURE
1. If the booster battery is installed in another vehicle, make sure the vehicles are not touching. Turn off all unnecessary lights and accessories.
When boosting, use the battery of matching or higher quality. Any other battery may be difficult to jump start with.
If jump starting is difficult, charge the battery for several minutes.
2. If required, remove all the vent plugs from the booster and discharged batteries.
Lay a cloth over the open vents on the batteries. (This helps reduce the explosion
hazard, personal injuries and burns.)
3. If the engine in the vehicle with the booster battery is not running, start it
and let it run for a few minutes. During jump starting, run the engine at about
2000 rpm with the accelerator pedal lightly depressed.
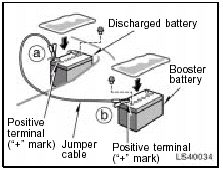
4. Make the cable connections in the order a, b, c, d.
a. Connect the clamp of the positive (red) jumper cable to the positive (+) terminal on the discharged battery.
b. Connect the clamp at the other end of the positive (red) jumper cable to the positive (+) terminal on the booster battery.
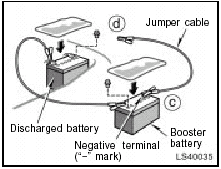
c. Connect the clamp of the negative (black) jumper cable to the negative (-) terminal on the booster battery.
d. Connect the clamp at the other end of the negative (black) jumper cable to a solid, stationary, unpainted, metallic point of the vehicle with the discharged battery.
The recommended connecting point is shown in the following illustration:
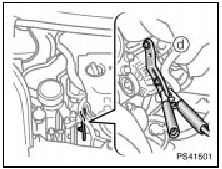
Connecting point
Do not connect the cable to or near any part that moves when the engine is cranked.
CAUTION.
When making the connections, to avoid serious injury, do not lean over the battery or accidentally let the jumper cables or clamps touch anything except the correct battery terminals or the ground.
5. Charge the discharged battery with the jumper cables connected for approximately 5 minutes. At this time, run the engine in the vehicle with the booster battery at about 2000 rpm with the accelerator pedal lightly depressed.
6. Start your engine in the normal way.
After starting, run it at about 2000 rpm for several minutes with the accelerator pedal lightly depressed.
7. Carefully disconnect the cables in the exact reverse order: the negative cable and then the positive cable.
8. Carefully dispose of the battery cover cloths—they may now contain sulfuric acid.
9. If removed, replace all the battery vent plugs.
If the cause of your battery discharging is not apparent (for example, lights left on), you should have it checked at your Toyota dealer.
If the first start attempt is not successful...
Check that the clamp on the jumper cables are tight. Recharge the discharged battery with the jumper cables connected for several minutes and restart your engine in the normal way.
If another attempt is not successful, the battery may be depleted. Have it checked at your Toyota dealer.
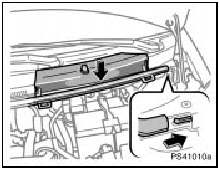
AFTER JUMP STARTING
Install the cover as shown in the illustration.
NOTICE.
After installed the cover, make sure the cover is securely in its original position. If it is not secured, it may be damaged to your vehicle.

 If your engine stalls while driving
If your engine stalls while driving...
1. Reduce your speed gradually, keeping a straight line. Move cautiously off
the road to a safe place.
2. Turn on your emergency flashers.
3. Turn the ignit ...
See also:
Protecting your Toyota from corrosion
Toyota, through its diligent research, design and use of the most advanced technology
available, helps prevent corrosion and provides you with the finest quality vehicle
construction. Now, it is u ...
Anti-glare inside rear view mirror
Glare from the headlights of vehicles behind can be reduced by using the following functions:
Normal position
Anti-glare position
Adjusting the height of rear view mirror
Adjust the height ...
Center body pillar (CUT): 5-Door
REPLACEMENT
REMOVAL
INSTALLATION
Temporarily install the new parts and measure each part of the new parts in accordance
with the body dimension diagram. (See the body dimension diagram) Inspe ...