 Toyota Yaris: Checking tire inflation pressure
Keep your tire inflation pressures at the proper level.
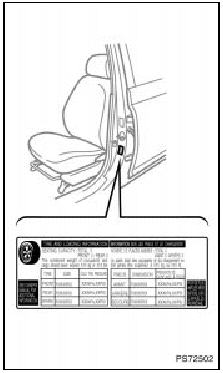
The recommended cold tire inflation pressures, tire sizes and the combined weight of occupants and cargo (vehicle capacity weight). They are also described on the tire and loading information label as shown.
You should check the tire inflation pressures every two weeks, or at least once a month. And do not forget the spare!
The following instructions for checking tire inflation pressure should be observed:
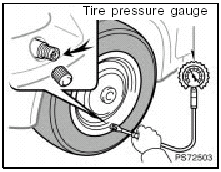
- The pressure should be checked only when the tires are cold.
If your vehicle has been parked for at least 3 hours and has not been driven for more than 1.5 km or 1 mile since, you will get an accurate cold tire inflation pressure reading.
- Always use a tire pressure gauge.
The appearance of a tire can be misleading. Besides, tire inflation pressures that are even just a few pounds off can degrade ride and handling.
- Take special care when adding air to the compact spare tire.
The smaller tire size can gain pressure very quickly. Add compressed air in small quantities and check the pressure often until it reaches the specified pressure.
- Do not bleed or reduce tire inflation pressure after driving.
It is normal for the tire inflation pressure to be higher after driving.
- Never exceed the vehicle capacity weight.
Passenger and luggage weight should be located so that the vehicle is balanced.
INSPECTION AND ADJUSTMENT PROCEDURE
1. Remove the tire valve cap.
2. Press the tip of the tire pressure gauge to the tire valve.
3. Read the pressure using the graduations of the gauge.
4. In case the tire inflation pressure is not within the prescribed range, insert the compressed air from the valve. In case of applying too much air, press the center of the valve and release the air to adjust.
5. After completing the tire inflation pressure measurement and adjustment, apply soapy water to the valve and check for leakage.
6. Install the tire valve cap.
If a gauge and air pump are not available, have your vehicle checked by your Toyota dealer.
CAUTION.
Be sure to reinstall the tire valve caps. Without the valve caps, dirt or moisture could get into the valve core and cause air leakage.
If the caps have been lost, have new ones put on as soon as possible.
Incorrect tire inflation pressure may waste fuel, reduce the comfort of driving, reduce tire life and make your vehicle less safe to drive.
If a tire frequently needs refilling, have it checked by your Toyota dealer.
CAUTION.
Keep your tires properly inflated.
Otherwise, the following conditions may occur and cause an accident resulting in death or serious injuries.
Low tire pressure (underinflation) : Excessive wear.
Uneven wear.
Poor handling.
Possibility of blowouts from an overheated tire.
Poor sealing of the tire bead.
Wheel deformation and/or tire separation.
A greater possibility of tire damage from road hazards.
High tire pressure (overinflation): Poor handling.
Excessive wear.
Uneven wear.
A greater possibility of tire damage from road hazards.
 Checking brake fluid
Before checking or adding the brake fluid, remove the cover. (See “(c) Jump
starting”).
To check the fluid level, simply look at the see-through reservoir. The level
should be between the � ...
 Checking and replacing tires
CHECKING YOUR TIRES
Check the tire’s tread for tread wear indicators. If the indicators show,
replace the tires. The location of tread wear indicators is shown by the “TWI” or
“” ma ...
See also:
Rocker outer panel (CUT): 5-Door
REPLACEMENT
REMOVAL
INSTALLATION
Temporarily install the new parts and measure each part of the new parts in accordance
with the body dimension diagram. (See the body dimension diagram) Inspe ...
Front fender mounting bracket (ASSY)
REPLACEMENT
REMOVAL
INSTALLATION
Temporarily install the new parts and measure each part of the new parts in accordance
with the body dimension diagram. (See the body dimension diagram) Inspe ...
Rear seats
The seatbacks of the rear seats can be folded down.
Stow the rear seat belt buckles as shown.
Stow the seat belts.
Center
→P. 55
Outside
Use the seat belt hangers to prevent the belts ...