 Toyota Yaris: Interior light
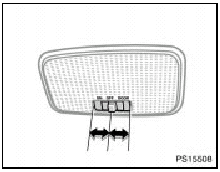
To turn on the interior light, slide the switch.
The interior light switch has the following positions: “ON”—Keeps the light on all the time.
“OFF”—Turns the light off.
“DOOR”—Turns the light on when any side doors are opened. The light goes off when all the side doors are closed.
ILLUMINATED ENTRY SYSTEM
Door linked operation—When the switch is in the “DOOR” position and any of the side doors is opened, the light will come on. After all the side doors are closed, the light remains on for about 15 seconds before fading out.
Ignition switch linked operation—When the switch is in the “DOOR” position, and the ignition switch is turned to “LOCK”, the light will come on. The light remains on for about 15 seconds before fading out.
However, in the following cases, the light goes off immediately.
All the side doors are closed when the ignition key is in the “ACC” or “ON” position.
Vehicles with the power door lock system —All the side doors and back door are closed and locked.
Vehicles with the power door lock system —When the driver’s door is unlocked using either the key or the wireless remote control, the interior light will come on and remain on for about 15 seconds before fading out.
Vehicles with the power door lock system and vehicles sold in Puerto Rico—The following adjustments can be made in this system. For details, contact your Toyota dealer.
Vehicles with the power door lock system —Cancelling the door key or the wireless remote control linked operation.
Cancelling the ignition switch linked operation.
Changing the duration of lighting.
To prevent the battery being discharged, the light will automatically turn off when the key is removed and the side door is left opened with the switch at the “DOOR” position for 20 minutes or more.
 Front fog lights
To turn on the front fog lights, twist the band of the headlight and turn
signal switch lever. They will come on when the head lights are on low beam.
...
 Personal lights
To turn on the personal light, push the lens. To turn the light off, push
the lens once again.
...
See also:
Body dimension drawings
ENGINE COMPARTMENT Hatchback
ENGINE COMPARTMENT Sedan
BODY OPENING AREAS (Side View) Hatchback 3 Door
BODY OPENING AREAS (Side View: Front) Hatchback 5 Door
BODY OPENING AREAS (Side View: ...
Cargo and luggage
Take notice of the following information about storage precautions, cargo
capacity and load:
● Stow cargo and luggage in the luggage compartment whenever possible.
● Be sure all items ...
Automatic transmission
Your automatic transmission has a shift lock system to minimize the possibility
of incorrect operation. This means you can only shift out of “P” position when the
brake pedal is depressed (w ...