
Toyota RAV4: Maintenance and care - Wiper insert replacement
When replacing a wiper insert on the Toyota RAV4, follow the procedure below carefully to remove, service, and reinstall each wiper component in the correct order.
Windshield wipers
■ Windshield wiper blade removal and installation
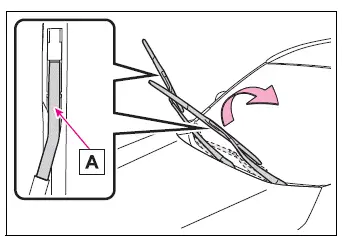
1. Hold the hook portion A of each wiper arm securely. Raise the driver-side wiper arm first, followed by the passenger-side wiper arm.
When returning the wiper arms to their normal positions, lower the passenger-side arm first and then lower the driver-side arm. Following this sequence helps prevent the two arms from interfering with each other.
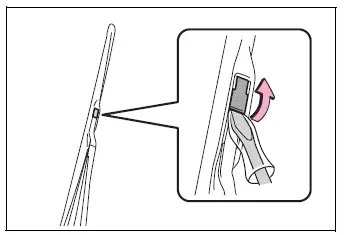
2. Insert a flathead screwdriver beneath the stopper and carefully lift it as shown in the illustration.
Wrap the tip of the screwdriver with a clean rag before use. This protects the wiper arm and surrounding surfaces from scratches or marks while the stopper is being released.
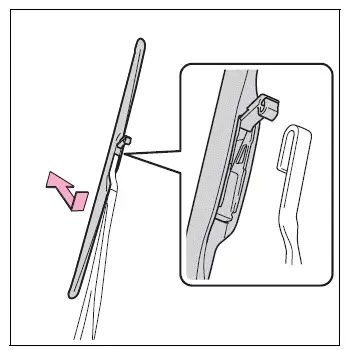
3. Slide the wiper blade in the indicated direction until it separates from the wiper arm.
To install the wiper blade, perform the removal steps in reverse order. After installation, confirm that the blade is seated correctly and that the stopper is fully secured.
■ Wiper insert replacement
1. Pull the wiper insert until the claw on the wiper blade disengages from the stopper. Continue pulling the insert smoothly until it is completely removed from the blade.
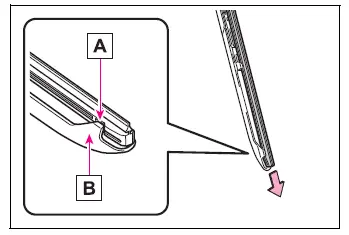
- Stopper
- Claw
2. Remove the 2 metal plates from the old wiper insert and install them in the corresponding grooves of the new insert.
Compare the new insert with the original before assembly. Make sure the cutout positions and the curved direction of both metal plates match their original orientation so the insert follows the windshield correctly.
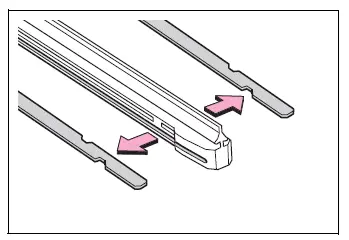
3. Insert the new wiper insert into the wiper blade from the end without the stopper. Feed it through each retaining claw without twisting or bending the rubber unnecessarily.
4. Continue sliding the insert into position, then engage its stopper securely with the claw on the wiper blade. Check that the insert is held evenly along the entire blade before reinstalling it on the Toyota RAV4.
Rear window wiper
1. Raise the cap at the head of the rear window wiper arm to expose the blade attachment area.
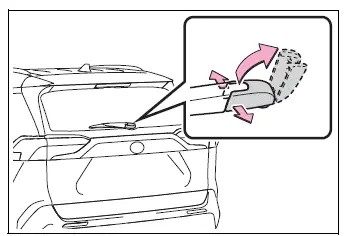
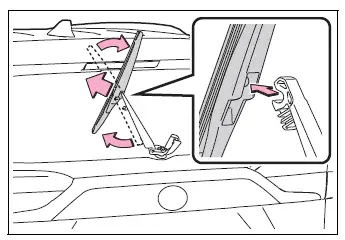
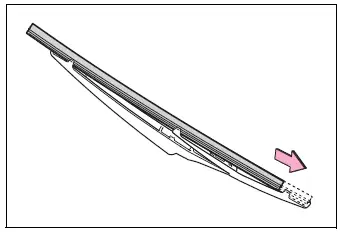
2. Move the rear wiper blade in the indicated direction until a click is heard and the retaining claw disengages. Once released, remove the blade carefully from the wiper arm.
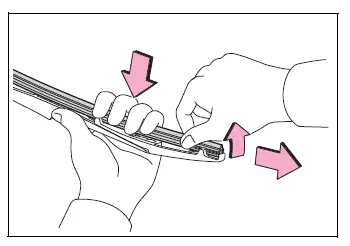
3. Pull the rear wiper insert beyond the stopper on the blade, then continue drawing it outward until it is fully removed.
Lightly press the blade between its retaining claws so the insert rises slightly. This creates additional clearance and allows the insert to slide out more easily without excessive force.
4. Remove the 2 metal support plates from the old wiper insert, keeping track of their position and orientation. Install both plates into the corresponding grooves of the replacement insert so they match the arrangement of the original parts.
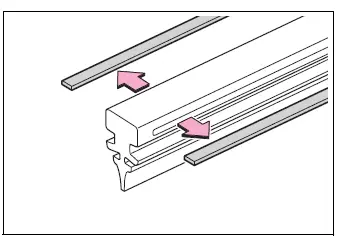
5. Begin inserting the replacement wiper insert at the center claw of the wiper blade. Guide the insert through the first 3 claws until its end extends beyond the stopper, then pass it carefully through the final remaining claw.
Applying a small amount of washer fluid to the replacement insert can reduce friction and make it easier to guide the claws into the rubber grooves. Use only enough fluid to lightly moisten the contact area.
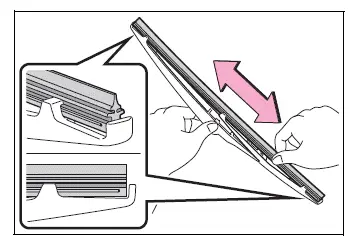
6. Inspect the complete length of the wiper blade and verify that every retaining claw is seated inside the correct groove of the wiper insert.
If one or more claws are not engaged properly, hold the insert securely and slide it back and forth several times until each claw enters its groove. Do not force the rubber sideways or twist the metal support plates.
Lightly raising the center section of the wiper insert can reduce resistance and allow the rubber to move more smoothly through the retaining claws.
7. Reinstall the rear wiper blade by reversing the removal procedure described in step 1.
After attaching the blade to the Toyota RAV4 wiper arm, confirm that the connection is fully locked. Gently move the blade by hand to make sure it cannot separate from the arm during operation.
■ Wiper blade and wiper insert handling
Incorrect handling can bend the wiper blade, damage the rubber insert, or prevent the blade from cleaning the glass evenly. If any part of the replacement procedure is unclear, or if the blade cannot be secured correctly, contact a Toyota dealer rather than forcing the components together.
NOTICE
■ When lifting the windshield wipers
- When raising the wiper arms away from the windshield, lift the driver-side arm first and then the passenger-side arm. When returning them to the glass, lower the passenger-side arm first, followed by the driver-side arm. Using the correct sequence prevents the arms and blades from contacting each other.
- Never lift a windshield wiper by pulling on the blade itself. Hold the wiper arm instead, as lifting by the blade can bend its frame, stretch the insert, or affect its contact with the windshield.
- Do not operate the wiper control lever while the windshield wipers are raised. The moving arms may strike the hood and damage the Toyota RAV4 hood surface, wiper arms, blades, or related mounting points.
■ To prevent damage
- Handle the retaining claws carefully during wiper insert replacement. Bending or breaking a claw can prevent the new insert from remaining securely positioned inside the blade.
- After removing the rear wiper blade from its arm, place a folded cloth or another soft protective material between the rear window and the exposed wiper arm. This prevents the arm from striking and scratching or cracking the glass.
- Do not pull the wiper insert with excessive force or bend, twist, or permanently deform its metal support plates. Damaged plates may prevent the insert from following the shape of the glass and can result in uneven wiping.