Toyota RAV4: Before driving - Adjusting the seats
Front seats Toyota RAV4 hybrid
The front seats can be adjusted longitudinally, vertically, and through other available settings. Position the seat carefully to achieve a comfortable and correct driving posture in the Toyota RAV4.
Adjustment procedure
Manual seat
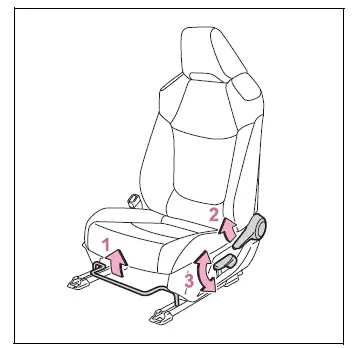
- Seat position adjustment lever
- Seatback angle adjustment lever
- Vertical height adjustment lever on the driver's side only
Power seat
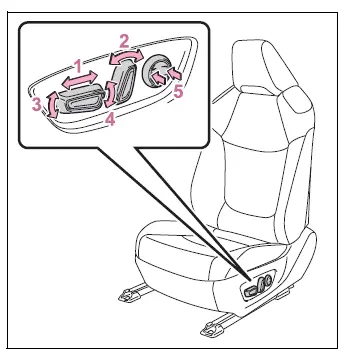
- Seat position adjustment switch
- Seatback angle adjustment switch
- Seat cushion front angle adjustment switch
- Vertical height adjustment switch
- Lumbar support adjustment switch on the driver's side only
■ When adjusting the seat
Adjust the seat carefully and make sure the head restraint does not contact the ceiling or sun visor. Check the available clearance throughout the adjustment range before settling on the final position.
WARNING
■ When adjusting the seat position
- Use caution while moving the seat and make sure the adjustment does not injure another passenger.
- Do not place your hands beneath the seat or near any moving components during adjustment.
Fingers or hands may become trapped in the seat mechanism and cause injury.
- Make sure there is sufficient space around each occupant's feet so they do not become trapped by the moving seat.
- Manual seat only: After completing the adjustment, confirm that the seat is securely locked in position before driving.
■ Seat adjustment
To reduce the risk of sliding beneath the lap belt during a collision, do not recline the seatback farther than necessary.
If the seatback is excessively reclined, the lap belt may move above the hips and apply restraint force directly to the abdomen. The occupant's neck may also contact the shoulder belt, increasing the possibility of death or serious injury in an accident.
Do not adjust the seat while the Toyota RAV4 is moving. The seat could shift unexpectedly and cause the driver to lose control of the vehicle.
Rear seats Toyota RAV4 XA50
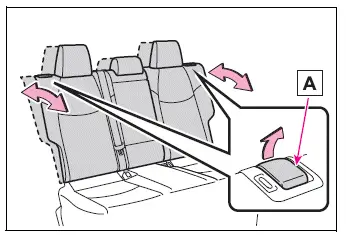
The rear seatbacks can be reclined or folded by operating the appropriate adjustment lever. Complete each movement carefully and confirm that the seatback is securely positioned afterward.
Adjustment procedure
Pull seatback angle adjustment lever A, move the seatback to the preferred angle, and then release the lever to secure the seatback.
WARNING
■ When operating the seatback
Observe the following precautions whenever adjusting or moving a rear seatback.
Failure to follow these precautions may result in death or serious injury.
- Make sure the moving seatback does not strike another passenger.
- Keep hands and other parts of the body away from moving components, seat joints, and the space between the seats to prevent them from becoming caught.
- After adjusting the seatback, confirm that it is securely locked in position.
If the seatback is not fully locked, the red marking will remain visible. Make sure the red marking is no longer visible before the seat is used.
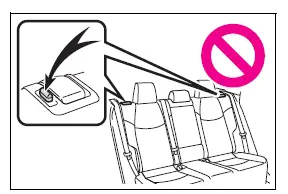
Folding down the rear seatbacks
■ Before folding down the seatbacks
1. Park the Toyota RAV4 in a safe location before beginning the folding procedure.
2. Adjust the front seat position and seatback angle as necessary. Depending on the position of the front seat, a rear seatback being folded forward may interfere with the front seat or prevent the rear seat from moving correctly.
3. Raise and then fully lower the head restraints on the rear outboard seats, and lower the rear center head restraint.
4. Return the rear seat armrest to its stored position if it has been pulled down.
This step is not required when folding only the left-side rear seatback.
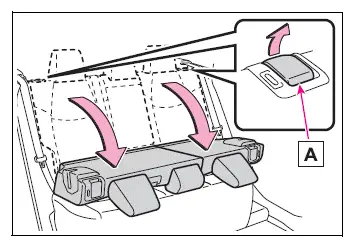
■ Folding down the seatbacks
Pull seatback angle adjustment lever A while carefully folding the corresponding rear seatback forward.
■ Returning the rear seatbacks
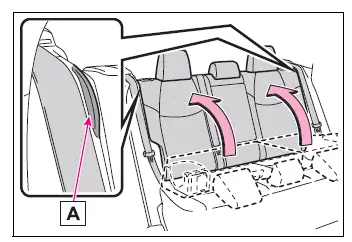
To prevent the seat belt from becoming trapped between the seat and the interior trim, route the belt outside seat belt guide A. Raise the seatback and return it firmly to the upright, locked position.
WARNING
Observe the following precautions when folding or returning the rear seatbacks.
Failure to follow these precautions may result in death or serious injury.
■ When folding the rear seatbacks down
- Do not fold the rear seatbacks while driving.
- Stop the vehicle on level ground, apply the parking brake, and shift the shift lever to P before operating the rear seats.
- Do not allow anyone to sit on a folded seatback or ride in the luggage compartment while the vehicle is moving.
- Do not allow children to enter or play inside the luggage compartment.
- Do not operate a rear seat while it is occupied.
- Keep feet, hands, and other parts of the body away from the moving components and joints of the seats during operation.
- Do not allow children to operate or adjust the rear seats.
■ After returning the rear seatback to the upright position
- Lightly push the seatback forward and backward to confirm that it is securely locked in position.
If the seatback is not fully locked, the red marking will be visible. Make sure the red marking is completely hidden before carrying passengers in the Toyota RAV4.
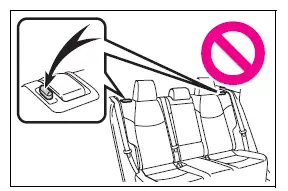
- Check that the rear seat belts are not twisted, pinched, or trapped behind the upright seatback.
Driving position memory Toyota RAV4 (XA50)
This feature automatically adjusts the driver's seat to a previously stored position, allowing the Toyota RAV4 driving position to be tailored to individual preferences.
Your preferred driver's seat position can be recorded and recalled by pressing the corresponding memory button.
Two separate driving positions can be stored in the system memory, making it convenient for different drivers or seating preferences.
Each electronic key can also be registered to recall a specific preferred driving position automatically.
Recording/recalling a driving position
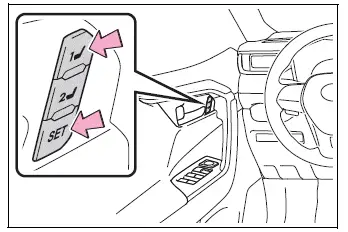
■ Recording procedure
1. Check that the shift lever is in P.
2. Turn the engine switch to ON.
3. Adjust the driver's seat to the desired position.
4. While pressing the "SET" button, or within 3 seconds after pressing it, press button "1" or "2" and continue holding the selected button until the buzzer sounds.
If the selected memory button already contains a stored position, the previous setting will be overwritten by the newly adjusted driver's seat position.
■ Recall procedure
1. Check that the shift lever is in P.
2. Turn the engine switch to ON.
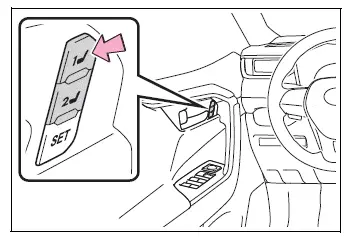
3. Press and hold button "1" or "2" for the driving position you want to recall until the buzzer sounds.
The driver's seat will then move toward the position stored under the selected memory button.
■ To stop the position recall operation part-way through
Perform any of the following actions to stop the driver's seat before the recall operation is completed:
- Press the "SET" button.
- Press memory button "1" or "2".
- Operate any of the driver's seat adjustment switches.
■ Seat positions that can be memorized
All adjusted driver's seat positions can be stored except for the setting controlled by the lumbar support adjustment switch.
■ Operating the driving position memory after turning the engine switch to OFF
A recorded seat position can be recalled for up to 180 seconds after the driver's door is opened and for an additional 60 seconds after the driver's door is closed again.
■ In order to correctly use the driving position memory function
If the seat is already at the furthest possible point of its adjustment range and is operated farther in the same direction, the position reached during recall may differ slightly from the originally recorded position.
■ When recalling the driving position
Use caution while recalling a stored driving position and make sure the head restraint does not contact the ceiling as the driver's seat moves.
■ If the battery is disconnected
The stored driving positions will be erased if the vehicle battery is disconnected.
■ When the recorded seat position cannot be recalled
A stored seat position may not be recalled in certain circumstances when it was recorded within a particular adjustment range. Contact your Toyota dealer for additional information if the Toyota RAV4 driving position memory does not operate as expected.
WARNING
■ Seat adjustment caution
Use caution while the driver's seat is moving. Make sure it does not strike a rear passenger or press the driver's body against the steering wheel, as this could cause injury.
Registering/recalling/canceling a driving position to an electronic key (memory recall function)
■ Registering procedure
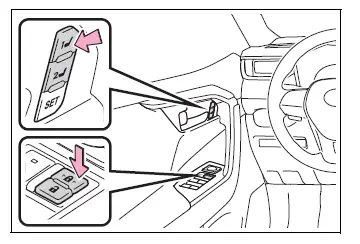
Before beginning the following procedure, record the preferred driving position to memory button "1" or "2". Carry only the electronic key that you want to register, and then close the driver's door.
If 2 or more electronic keys are inside the vehicle, the selected driving position may not be registered to the intended key correctly.
1. Check that the shift lever is in P.
2. Turn the engine switch to ON.
3. Recall the driving position that you want to register to the electronic key.
4. While pressing and holding the recalled memory button, press and hold either the lock or unlock side of the door lock switch until the buzzer sounds.
If the electronic key cannot be registered, the buzzer will sound continuously for approximately 3 seconds.
■ Recall procedure
Before recalling the registered driving position, make sure the doors are locked. Carry the electronic key that has been linked to the stored position, and then unlock and open the driver's door using the smart key system or wireless remote control.
The driver's seat will automatically move to the driving position registered to that electronic key.
If the driver's seat is already in the registered position, it will not move.
■ Cancellation procedure
Carry only the electronic key for which you want to cancel the memory recall registration, and then close the driver's door.
If 2 or more electronic keys are inside the vehicle, the driving position registration may not be canceled from the intended key correctly.
1. Check that the shift lever is in P.
2. Turn the engine switch to ON.
3. While pressing and holding the "SET" button, press and hold either the lock or unlock side of the door lock switch until the buzzer sounds twice.
If the registration cannot be canceled, the buzzer will sound continuously for approximately 3 seconds.
■ Recalling the driving position using the memory recall function
- Different driving positions can be registered for individual electronic keys.
The position recalled by the Toyota RAV4 may therefore vary depending on which registered electronic key is being carried.
- If a door other than the driver's door is unlocked using the smart key system, the registered driving position will not be recalled automatically. In this case, press the memory button assigned to the desired driving position.
■ Customization
Certain settings, including the door unlock settings associated with the memory recall function, can be customized according to the available vehicle options.
Head restraints Toyota RAV4 compact crossover
Head restraints are provided for every seat in the Toyota RAV4. Position each restraint correctly before driving or carrying passengers.
WARNING
■ Head restraint precautions
Observe the following precautions when adjusting, removing, or installing the head restraints.
Failure to follow these precautions may result in death or serious injury.
- Use only the head restraint designed for the corresponding seat.
- Always adjust each head restraint to the correct position before the seat is occupied.
- After completing an adjustment, push down on the head restraint and confirm that it is securely locked in position.
- Do not drive the vehicle with any required head restraint removed.
Vertical adjustment
■ Front seats
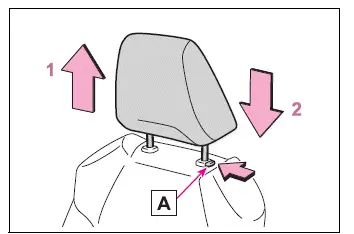
- Up
Pull the head restraint upward until it reaches the desired position. - Down
While pressing lock release button A, push the head restraint downward to the required height.
■ Center rear seat
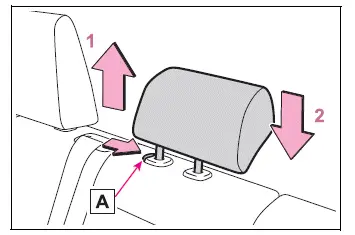
- Up
Pull the center rear head restraint upward to raise it. - Down
Press and hold lock release button A while pushing the head restraint downward.
■ Outboard rear seats
The outboard rear seat head restraints have a fixed position and cannot be adjusted vertically.
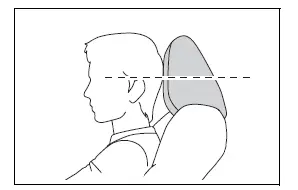
■ Adjusting the height of the head restraints (front seats)
Adjust each front head restraint so that its center is positioned as close as possible to the upper part of the occupant's ears. Confirm that the restraint remains securely locked after making the adjustment.
■ Adjusting the center rear seat head restraint
Whenever the center rear seat is occupied, raise its head restraint at least one locking position above the fully stowed position.
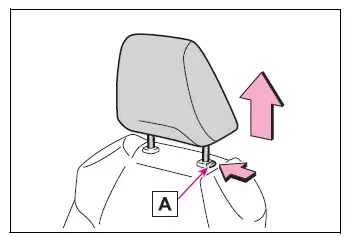
Removing the head restraints
Press and hold lock release button A while pulling the head restraint straight upward and out of the installation holes.
If the head restraint contacts the ceiling and cannot be removed easily, adjust the seat height or seatback angle to create sufficient clearance.
Installing the head restraints
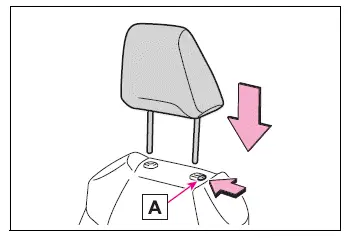
■ Front and center rear seats
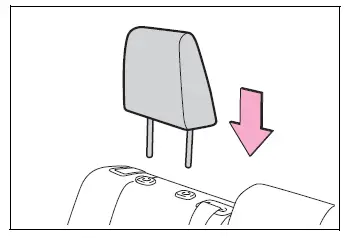
Align the head restraint posts with the corresponding installation holes, and then push the restraint downward until it reaches a secure locking position.
Press and hold lock release button A when lowering the head restraint through the available adjustment positions.
■ Outboard rear seats
Align the head restraint posts with the installation holes and push the restraint down until it reaches the lowest locked position. Check that it is securely installed before the rear seat is used.