 Toyota Yaris: Adhesive Application Area Work Procedure
NOTE.
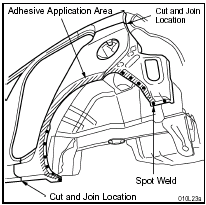
This vehicle has areas on the Quarter Panel and Quarter Wheel Housing Outer Panel that are joined together only with adhesive. It is necessary to conduct the correct repair procedures for high durability so make sure to follow the instructions below for the adhesive application areas.
Type of adhesive used: 3M8115 Auto Mix Panel Bond
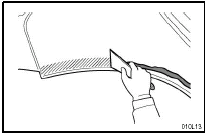
1. Removal of the Quarter Panel.
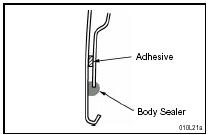
(A) Remove the body sealer from the Quarter Panel and cut at the cut and join location. Remove the spot welded portions.
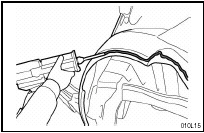
(B) After rough cutting the Wheel Arch portion, heat the adhesive applied area and remove the panel. {Heat the Wheel Arch portion of the Quarter Panel at 110 to 140 C (230 to 284 F) with a dryer or gas burner and remove the Quarter Panel.}
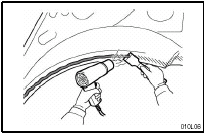
2. Removal of the previous adhesive coating.
(A) Heat at 110 to 140 C (230 to 284 F) with a dryer or gas burner.
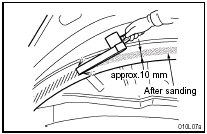
(B) Scrape away the adhesive with a scraper, and scuff while sanding with a disc grinder or a belt sander.
NOTE.
Make sure to use either a disc grinder or belt sander to sand coarsely and deeply to improve adhesiveness.
Scuff at a width of approximately 10 mm (0.39 in.) over the previous adhesive coating.
3. Treatment of the spot welded portions on the body.
(A) After the adhesive has been removed from the body, remove the paint from the underside of the spot welded points blow air and degrease.
(B) Apply spot sealer at the joined portion between panels.
4. Attachment of the New Quarter Panel
(A) Temporarily attach the new panel and check the fitting condition, the cut and join locations, the welded areas, and the adhesive applied area.
NOTE.
Check the adhesive applied condition to ensure adhesive strength.
Conduct hammering to fix the non-adhered portions.

5. Adhesive Application to New Quarter Panel
(A) Scuff with #60-120 grit sandpaper at the adhesive application area.
POINT Sand deeply into the ED coat.
(B) Blow air around the scuffed portion and then degrease.
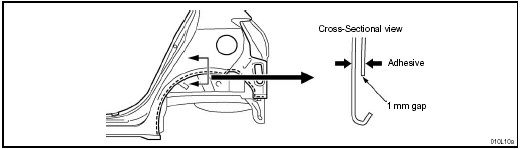
(C) Apply adhesive.
POINT Apply adhesive at a width of approximately 10 mm (0.39 in.) at a location 28 mm (1.10 in.) from the panel flange edge.
Spread the adhesive flatly within the scuffed area {approximately 10 mm (0.39 in.) in width} to remove trapped air.
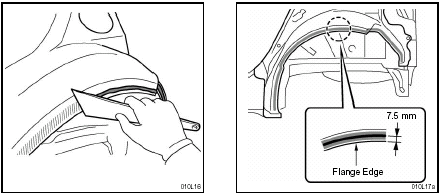
6. Application of Adhesive to the Body
(A) Degrease the adhesive aplication area.
(B) Apply adhesive.
Refer to the diagram of step 5 for the application amount.
The application location is 7.5 mm (0.295 in.) from the flange edge.
(C) Flatten out the applied adhesive with a spatula until it is at an even level.
Apply adhesive at exposed metal plate portions to prevent corrosion.
It is not necessary to flatten out adhesive after it has been reapplied.

7. Attachment of the new Quarter Panel
(A) Set the new panel in the position for temporary attachment.
(Be careful of where you hold the panel so as not to touch the adhesive applied surfaces.) (B) Secure in a vice grip or equivalent and check the fitting condition.
(C) Press on the entire surface so that the adhesive between the Quarter Panel and Quarter Wheel Housing Outer panel becomes an even thickness.
NOTE.
Be careful that adhesive that spills over does not contact the Brake Drum.
(D) Tack weld at the cut and join welded portion.
(E) Tack weld by spot welding at one point on both ends of the adhesive applied portions.
(F) Conduct actual welding using procedures in the BP section of this manual.
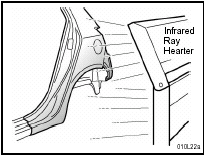
8. Drying
(A) Clean away adhesive that has spilled over with a degreaser or equivalent.
(B) After all welding works have been completed, dry the adhesive with a heater.
Hardening Time.
Forced drying.
60 C (140 F) at 90 minutes.
Natural drying.
24 C (75 F) (room temperature) for 24 hours.
9. Other work
(A) After applying Primer Surfacer to the underside of the Wheel Arch of the Quarter Panel, apply body sealer to the locations indicated in the body repair manual.
 Rocker outer panel (CUT): 5-Door
REPLACEMENT
REMOVAL
INSTALLATION
Temporarily install the new parts and measure each part of the new parts in accordance
with the body dimension diagram. (See the body dimension diagram) Inspe ...
 Quarter panel (CUT): 3-Door
REPLACEMENT
REMOVAL
INSTALLATION
Temporarily install the new parts and measure each part of the new parts in accordance
with the body dimension diagram. (See the body dimension diagram) Ins ...
See also:
Front fender mounting bracket (ASSY)
REPLACEMENT
REMOVAL
INSTALLATION
Temporarily install the new parts and measure each part of the new parts in accordance
with the body dimension diagram. (See the body dimension diagram) Inspe ...
Automatic transmission
Select a shift position appropriate for the driving conditions.
■ Shifting the shift lever
While the engine switch is in the “ON” position, move the shift lever with the
brake pedal ...
Brake system
The tandem master cylinder brake system is a hydraulic system with two separate
sub-systems. If either sub-system should fail, the other will still work. However,
the pedal will be harder to press ...