
Toyota RAV4: When trouble arises - Steps to take in an emergency
- If you suspect something is wrong
- If a warning light turns on or a warning buzzer sounds
- If a warning message is displayed
- If you have a flat tire (vehicles without spare tire)
- Emergency repair method
- If you have a flat tire (vehicles with spare tire)
- Installing the spare tire
- If the engine will not start
- If the electronic key does not operate properly (vehicles with smart key system)
- If the vehicle battery is discharged
- If your Toyota RAV4 overheats
- If your Toyota RAV4 becomes stuck
If you suspect something is wrong Toyota RAV4 (XA50)
If you notice any of the symptoms listed below, your Toyota RAV4 may require inspection, adjustment, or repair. Do not ignore unusual changes in the vehicle’s appearance, sound, or operation. Contact your Toyota dealer as soon as possible so the cause can be identified and corrected.
Visible symptoms
- Fluid leaking beneath the vehicle. Water dripping after the air conditioning system has been used is normal and does not usually indicate a malfunction.
- Tires that appear underinflated, damaged, or worn unevenly across the tread surface.
- The engine coolant temperature gauge needle remains higher than its normal position or repeatedly moves into an unusually high range.
Audible symptoms
- A noticeable change in the sound produced by the exhaust system.
- Excessive tire squealing while the Toyota RAV4 is turning or cornering under normal driving conditions.
- Unusual knocking, rattling, or other unfamiliar noises associated with the suspension system.
- Pinging, knocking, or other abnormal sounds coming from the engine while it is running.
Operational symptoms
- The engine misfires, hesitates, stumbles, or runs noticeably rougher than usual.
- A significant or unexpected reduction in engine power or vehicle performance.
- The vehicle pulls strongly toward one side when the brakes are applied.
- The vehicle consistently pulls heavily to one side while driving on a flat, level road.
- Reduced braking effectiveness, a soft or spongy brake pedal, or a brake pedal that travels unusually close to the floor.
Fuel pump shut off system
To reduce the possibility of fuel leakage when the engine stalls or an airbag deploys during a collision, the fuel pump shut off system automatically stops the supply of fuel to the engine. This protective function may prevent the Toyota RAV4 engine from restarting until the correct procedure is followed.
Restarting the engine
Use the procedure below to restart the engine after the fuel pump shut off system has been activated. Before proceeding, check the area around and beneath the vehicle for any sign of fuel leakage.
1. Turn the engine switch to ACC or off.
2. Restart the engine and pay attention to any warning indicators, unusual odors, or abnormal operation.
NOTICE
■ Before starting the engine, inspect the ground beneath the vehicle.
If fuel is visible on the ground, the fuel system may have been damaged and requires professional repair. Do not restart or continue operating the Toyota RAV4. Contact your Toyota dealer for assistance.
If a warning light turns on or a warning buzzer sounds Toyota RAV4 2026
If any warning light illuminates or begins flashing, or if a warning buzzer sounds, remain calm and respond appropriately. A light that appears briefly and then turns off does not always indicate a malfunction. However, if the same warning repeatedly appears, continues flashing, or is accompanied by unusual vehicle behavior, have your Toyota RAV4 inspected by your Toyota dealer as soon as possible.
Actions to take when warning lights illuminate or warning buzzers sound
Identify the illuminated symbol and any accompanying message shown on the multi-information display. Warning indicators should not be ignored, particularly when they remain on while driving or appear together with a buzzer.
■ Brake system warning light (warning buzzer)
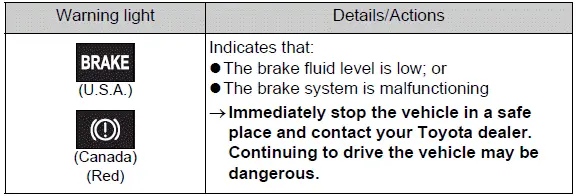
■ Brake system warning light
■ Charging system warning light*
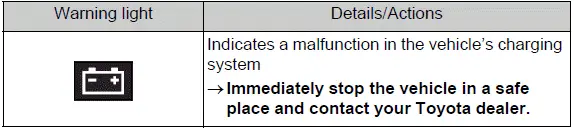
*: On Toyota RAV4 models equipped with the 12.3-inch multi-information display, this warning light appears on the display together with a message.
■ High coolant temperature warning light* (warning buzzer)
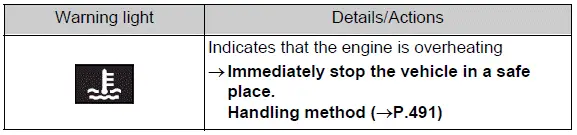
*: This warning light appears on the multi-information display together with a message providing additional information.
■ Low engine oil pressure warning light* (warning buzzer)
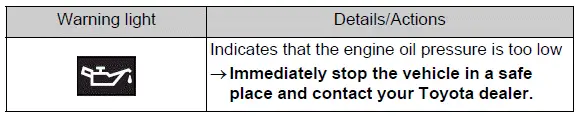
*: This warning light illuminates on the multi-information display and is accompanied by a message.
■ Malfunction indicator lamp
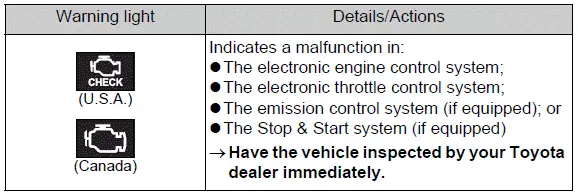
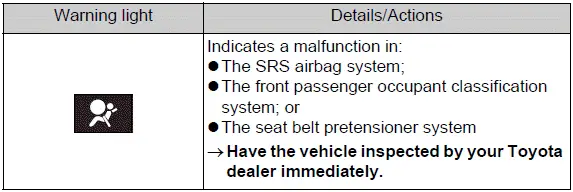
■ SRS warning light
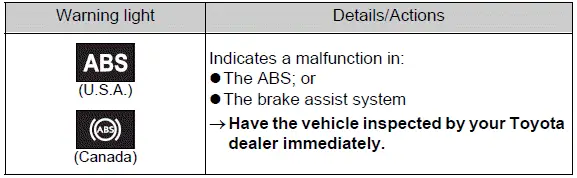
■ ABS warning light
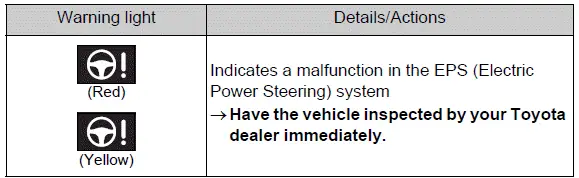
■ Electric power steering system warning light (warning buzzer)
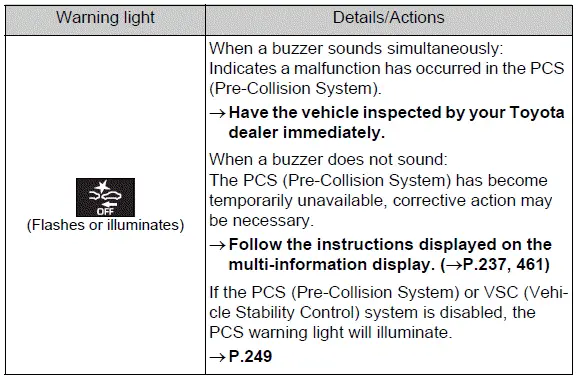
■ PCS warning light (warning buzzer)
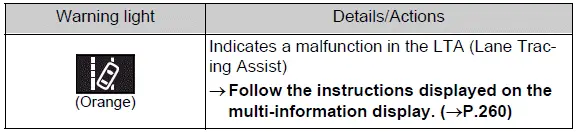
■ LTA indicator (warning buzzer)
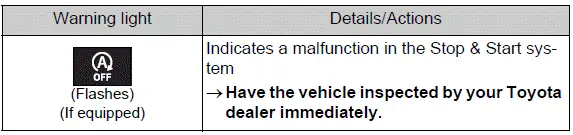
■ Stop & Start cancel indicator
■ Intuitive parking assist OFF indicator (warning buzzer)
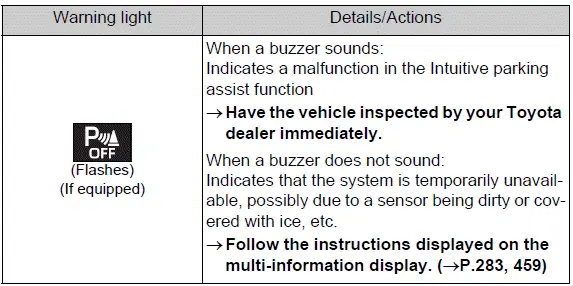
■ PKSB OFF indicator (warning buzzer)
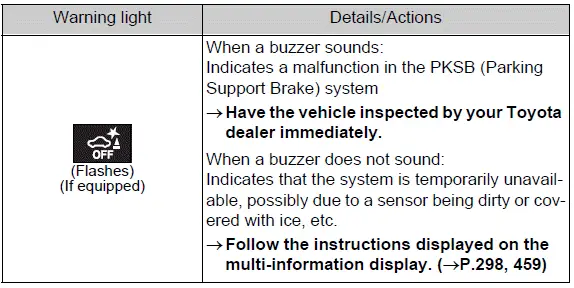
■ RCTA OFF indicator (warning buzzer)
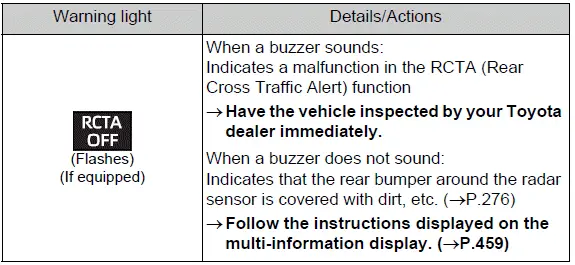
■ Slip indicator light
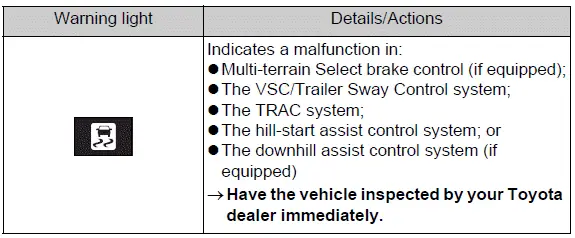
■ Inappropriate pedal operation warning light* (warning buzzer)
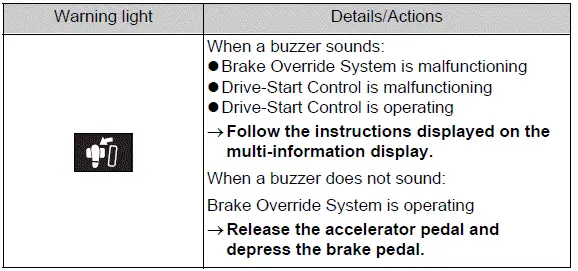
*: This warning light appears on the multi-information display together with a message. Read the displayed information carefully and respond without unnecessary delay to help maintain safe operation of the Toyota RAV4.
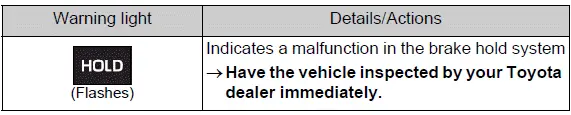
■ Brake hold operated indicator (warning buzzer)
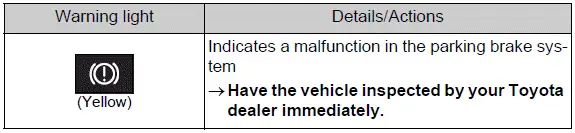
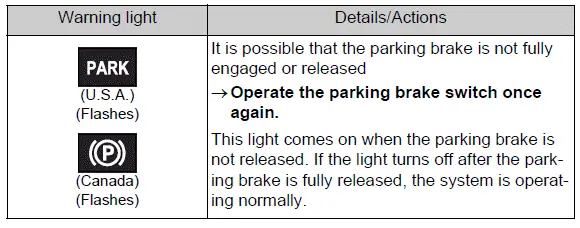
■ Parking brake indicator
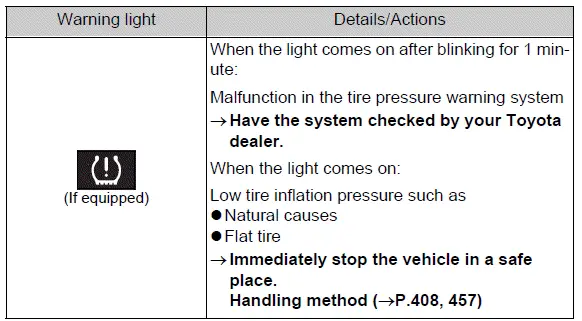
■ Tire pressure warning light
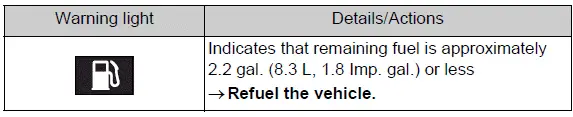
■ Low fuel level warning light
■ Driver's and front passenger's seat belt reminder light (warning buzzer*)
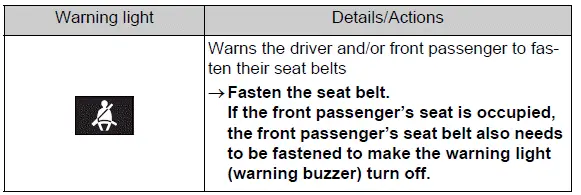
*: Driver's seat belt warning buzzer:
The driver's seat belt warning buzzer alerts the driver when the seat belt has not been fastened. The buzzer sounds after the engine switch is turned to ON. If the driver's seat belt remains unfastened, the buzzer will sound intermittently for a specified period after the Toyota RAV4 reaches a certain speed.
Front passenger's seat belt warning buzzer:
The front passenger's seat belt warning buzzer alerts the front passenger when the seat belt is not fastened. If the seat belt remains unfastened, the buzzer sounds intermittently for a specified period after the vehicle reaches a certain speed.
■ Rear passengers' seat belt reminder lights*1 (warning buzzer*2)
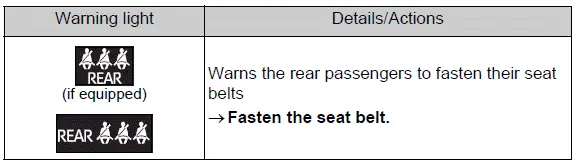
*1: These reminder lights illuminate on the multi-information display.
*2: Rear passengers' seat belt warning buzzer:
The rear passenger seat belt warning buzzer alerts a rear-seat occupant when the seat belt is not fastened. If a rear seat belt is fastened and then unfastened, the buzzer sounds intermittently for a specified period after the vehicle reaches a certain speed.
■ Warning buzzer
In some situations, the warning buzzer may be difficult to hear because of loud surrounding noise or sound from the audio system. Pay attention to the warning lights and messages displayed in the Toyota RAV4, even when no buzzer is clearly audible.
■ Front passenger detection sensor, seat belt reminder and warning buzzer
- If luggage or another object is placed on the front passenger seat, the front passenger detection sensor may cause the seat belt reminder light to flash and the warning buzzer to sound even though no passenger is occupying the seat.
- If a cushion is placed on the front passenger seat, the sensor may not detect the occupant correctly. As a result, the warning light and warning buzzer may not operate as expected.
■ SRS warning light
The SRS warning light system monitors the airbag sensor assembly, front impact sensors, front-door side impact sensors, front side impact sensors, driver's seat position sensor, driver's seat belt buckle switch, front passenger occupant classification system ECU and sensors, "AIR BAG ON" indicator light, "AIR BAG OFF" indicator light, front passenger's seat belt buckle switch, driver's seat belt pretensioner, front passenger's seat belt pretensioner and force limiter, airbags, interconnected wiring, and associated power sources. These components work together as part of the Toyota RAV4 supplemental restraint system.
■ If the malfunction indicator lamp comes on while driving
Begin by checking the following common causes before arranging an inspection:
- Is the fuel tank empty?
If the tank is empty, refuel the vehicle immediately and observe whether the warning light remains illuminated.
- Is the fuel tank cap loose or not installed correctly?
If the fuel tank cap is loose, tighten it securely until it is properly seated.
After the cause has been corrected, the malfunction indicator lamp may remain illuminated temporarily and should turn off after several driving trips.
If the light does not turn off after several trips, or if it continues to illuminate while driving, contact your Toyota dealer as soon as possible to have the Toyota RAV4 inspected.
■ Electric power steering system warning light (warning buzzer)
If the battery charge becomes too low or the voltage drops temporarily, the electric power steering system warning light may illuminate and the warning buzzer may sound. Steering assistance can also be affected until the electrical supply returns to a sufficient level.
■ When the tire pressure warning light comes on (vehicles with tire pressure warning system)
Inspect all tires carefully to determine whether any tire is punctured, visibly damaged, or significantly underinflated.
If none of the tires appear to be punctured, turn the engine switch to OFF and then turn it back to ON. Check whether the tire pressure warning light illuminates steadily or begins flashing.
If the tire pressure warning light flashes for approximately 1 minute and then remains illuminated
This condition may indicate a malfunction in the tire pressure warning system. Have the Toyota RAV4 inspected by your Toyota dealer immediately so the system can be checked and repaired if necessary.
If the tire pressure warning light comes on
1. Allow the tires to cool sufficiently, then check the inflation pressure of each tire and adjust it to the specified level. Tire pressure should be checked only after the temperature has stabilized enough to provide an accurate reading.
2. If the warning light remains illuminated after several minutes, confirm again that every tire is inflated to the specified pressure, and then perform the tire pressure warning system initialization procedure.
■ The tire pressure warning light may come on due to natural causes (vehicles with tire pressure warning system)
The tire pressure warning light may illuminate for natural reasons, including gradual air loss over time or changes in tire inflation pressure caused by variations in outside temperature.
In this situation, adjusting each tire to the correct inflation pressure should cause the warning light to turn off after a few minutes of Toyota RAV4 operation.
■ When a tire is replaced with a compact spare tire (vehicles with compact spare tire and tire pressure warning system)
The compact spare tire is not equipped with a tire pressure warning valve and transmitter. Therefore, if a flat tire is replaced with the compact spare, the tire pressure warning light will remain illuminated because the system cannot monitor the spare tire. Replace the compact spare with a standard tire as soon as appropriate, then adjust the inflation pressure to the specified level. The warning light should turn off after a few minutes.
WARNING
■ If a warning light comes on or a warning buzzer sounds when a warning message is shown on the multi-information display*
Read the message shown on the multi-information display and follow the stated instructions promptly. The displayed information identifies the condition requiring attention and may provide the action needed to protect the vehicle and its occupants.
Failure to respond correctly may result in death or serious injury.
*: Warning lights may illuminate in red or yellow, while the warning buzzer may beep once or sound continuously depending on the condition detected.
WARNING
■ When the electric power steering system warning light comes on
When the warning light illuminates yellow, electric power steering assistance is restricted. When it illuminates red, steering assistance is lost, and turning the steering wheel becomes extremely difficult.
If the steering wheel feels heavier than normal, grip it firmly and apply more force than usual while carefully controlling the Toyota RAV4.
■ If the tire pressure warning light comes on (vehicles with tire pressure warning system)
Observe all of the following precautions. Failure to respond properly may cause a loss of vehicle control and could result in death or serious injury.
- Stop the vehicle in a safe location as soon as conditions permit.
Check and adjust the tire inflation pressure immediately before continuing to drive.
- If the tire pressure warning light remains illuminated after the tire pressures have been adjusted, one of the tires may be flat or otherwise damaged. Inspect all tires carefully. If a tire is flat, replace it with the spare tire and have the damaged tire repaired by the nearest Toyota dealer.
- Avoid sudden steering movements, rapid acceleration, and hard braking. If the tires have deteriorated or lost significant pressure, the driver may lose control of the steering or braking performance of the Toyota RAV4.
■ If a blowout or sudden air leakage should occur (vehicles with tire pressure warning system)
The tire pressure warning system may not respond immediately to a sudden blowout or rapid loss of air. Maintain control of the Toyota RAV4, avoid abrupt steering or braking, and stop in a safe location as soon as conditions allow.
■ Maintenance of the tires (vehicles with tire pressure warning system)
Check every tire, including the spare tire if one is provided, at least once a month while the tires are cold. Inflate each tire to the pressure recommended by the vehicle manufacturer and shown on the vehicle placard or tire inflation pressure label, also referred to as the tire and load information label. If the Toyota RAV4 is fitted with tires of a different size from the size listed on that placard or label, determine and use the correct inflation pressure specified for those particular tires.
As an additional safety feature, the vehicle is equipped with a tire pressure monitoring system, also known as the TPMS or tire pressure warning system. The system illuminates the low tire pressure telltale, or tire pressure warning light, when one or more tires become significantly underinflated.
When the low tire pressure telltale illuminates, stop the vehicle in a safe place and inspect the tires as soon as possible. Check their condition and adjust each tire to the proper inflation pressure before continuing normal driving.
Driving with a significantly underinflated tire can cause excessive heat buildup and may result in tire failure. Insufficient tire pressure can also reduce fuel efficiency, shorten tread life, and adversely affect the handling and stopping performance of the Toyota RAV4.
The TPMS is not a substitute for regular tire inspection and maintenance. The driver remains responsible for maintaining the correct tire pressure, even when underinflation has not yet reached the level required to activate the low tire pressure warning light. Tires should therefore be checked routinely rather than only after a warning appears.
The vehicle is also equipped with a TPMS malfunction indicator that alerts the driver when the tire pressure warning system is not operating correctly.
The TPMS malfunction indicator is incorporated into the low tire pressure telltale. When the system detects a malfunction, the warning light flashes for approximately one minute and then remains continuously illuminated.
This warning sequence will occur during subsequent vehicle start-ups for as long as the malfunction remains present. While the malfunction indicator is illuminated, the system may be unable to detect or report low tire pressure as intended, so manual tire pressure checks become especially important.
A TPMS malfunction can occur for several reasons, including the installation of replacement or alternative tires or wheels that interfere with correct system operation. After replacing one or more tires or wheels, always check the TPMS malfunction indicator to confirm that the newly installed components allow the tire pressure warning system to continue functioning properly.
NOTICE
■ To ensure the tire pressure warning system operates properly (vehicles with tire pressure warning system)
Do not install tires with different specifications or from different manufacturers in combinations that are not appropriate for the vehicle. Incompatible tires may prevent the tire pressure warning system from operating correctly and may interfere with reliable pressure monitoring.
If a warning message is displayed Toyota RAV4 hybrid
The multi-information display presents warning messages when a system malfunction is detected, an operation has been performed incorrectly, or maintenance may be required. These messages help the driver identify the condition that needs attention.
When a message appears, read it carefully and carry out the correction procedure indicated on the display. Responding promptly can help prevent improper vehicle operation or further complications.
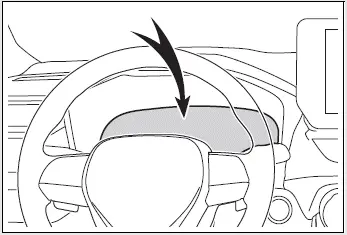
If the warning message appears again after the specified corrective actions have been completed, contact your Toyota dealer and have the Toyota RAV4 inspected.
■ Warning messages
The wording and appearance of the warning messages described below may differ from the messages actually shown on the multi-information display. Variations can occur depending on operating conditions, installed equipment, and vehicle specifications.
■ If a message about an operation is shown
- If a message concerning operation of the accelerator pedal or brake pedal is displayed
- A brake pedal operation warning may appear while a driving assistance feature, such as PCS (Pre-Collision System) or dynamic radar cruise control with full-speed range, is operating. When this type of message is shown, reduce the vehicle speed as necessary or follow the instructions displayed on the multi-information display.
- A warning message may be displayed when the Brake Override System is activated. Read the message and respond according to the stated instructions.
- A warning message may also appear when Drive-Start Control or Parking Support Brake, if equipped, operates. Follow the directions shown on the multi-information display before continuing to drive.
- If a message concerning operation of the engine switch is displayed (if equipped)
Instructions for operating the engine switch may appear when the engine starting procedure has been carried out incorrectly or when the engine switch has not been used as required. Follow the steps shown on the multi-information display, and then operate the engine switch again using the correct procedure.
- If a message concerning shift lever operation is displayed
To help prevent incorrect shift lever operation or unintended movement of the Toyota RAV4, the multi-information display may instruct the driver to select a particular shift position. When such a message appears, confirm the requested position and move the shift lever as directed.
- If a message or image concerning the open or closed state of a vehicle part, or the replenishment of a consumable, is displayed
Check the component identified by the multi-information display or the corresponding warning light. Then take the required action, such as securely closing an open door or replenishing the indicated consumable. Confirm that the message disappears after the condition has been corrected.
■ If a message indicating the need to visit your Toyota dealer is displayed
The system or component identified on the multi-information display may be malfunctioning and require professional diagnosis.
Have the Toyota RAV4 inspected by your Toyota dealer immediately. Do not ignore the message, even if the vehicle appears to operate normally.
■ If a message indicating the need to refer to the Owner's Manual is displayed
- If any of the following messages appear, a malfunction may have occurred.
Have the vehicle inspected by your Toyota dealer immediately so the affected system can be checked.
- "Charging System Malfunction"
- "Smart Key System Malfunction"
- "Engine Coolant Temp High"
- If either of the following messages appears, a serious malfunction may have occurred.
Stop the Toyota RAV4 immediately in a safe location and contact your Toyota dealer. Continuing to drive under these conditions may be dangerous and could lead to further vehicle damage.
- "Oil Pressure Low"
- "Braking Power Low"
■ If "Shift to P when Parked" is shown (if equipped)
This message is displayed when the driver's door is opened while the engine switch has not been turned to OFF and the shift lever is in a position other than P.
Move the shift lever securely to P before leaving the driver's seat or exiting the vehicle.
■ If "Auto Power OFF to Conserve Battery" is shown (if equipped)
Vehicle power was automatically turned off by the automatic power-off function to help prevent excessive battery discharge.
The next time the engine is started, slightly increase the engine speed and maintain that level for approximately 5 minutes to help recharge the battery.
■ If "Engine Oil Level Low Add or Replace" is displayed
The amount of engine oil may be below the required level.
Check the engine oil level correctly and add the appropriate engine oil if necessary.
This message may also appear when the Toyota RAV4 is stopped on an incline. Move the vehicle to a flat, level surface, allow the oil level to stabilize, and check whether the message disappears.
■ If "Maintenance Required Soon" is shown
This message indicates that maintenance based on the distance specified in the maintenance schedule* will soon be required.
The message appears approximately 4500 miles (7200 km) after it was last reset.
Arrange the required maintenance when necessary to keep the vehicle serviced according to the applicable schedule.
Reset the maintenance message after the scheduled work has been completed.
*: Refer to the separate "Scheduled Maintenance Guide" or "Owner's Manual Supplement" for the maintenance interval that applies to your Toyota RAV4.
■ If "Maintenance Required Visit Your Dealer" is shown
This message indicates that scheduled maintenance corresponding to the distance driven is now required. The applicable service items should be completed according to the maintenance schedule* for the Toyota RAV4.
The message appears approximately 5000 miles (8000 km) after it was last reset. The maintenance indicator may not operate correctly unless it is reset after each completed service. Arrange and perform the required maintenance without unnecessary delay.
After all scheduled maintenance has been completed, reset the message so the system can accurately track the next service interval.
*: Refer to the separate "Scheduled Maintenance Guide" or "Owner's Manual Supplement" for the maintenance interval applicable to your vehicle.
■ If "Engine Maintenance Required Visit Your Dealer" is shown
The engine or one of its related components may be malfunctioning. Have the Toyota RAV4 inspected by your Toyota dealer immediately, even if no obvious change in engine operation is noticed.
■ If a message indicating a front camera malfunction is displayed
The following driver assistance systems may be temporarily suspended until the condition described in the warning message has been resolved:
- PCS (Pre-Collision System)
- LTA (Lane Tracing Assist)
- AHB (Automatic High Beam)
- RSA (Road Sign Assist)*
- Dynamic radar cruise control with full-speed range
*: If equipped
■ If a message indicating a radar sensor malfunction is displayed
The following systems may be unavailable or temporarily suspended until the problem identified in the warning message has been corrected:
- PCS (Pre-Collision System)
- LTA (Lane Tracing Assist)
- Dynamic radar cruise control with full-speed range
■ If "Radar Cruise Control Unavailable See Owner's Manual" is shown
Dynamic radar cruise control with full-speed range has been temporarily suspended or will remain unavailable until the condition described in the message is resolved. Refer to the Owner's Manual for possible causes and the appropriate corrective actions.
■ If "Radar Cruise Control Unavailable" is shown
Dynamic radar cruise control with full-speed range cannot be used temporarily. Continue driving without relying on this function and use the system again only after the message disappears and operation becomes available.
NOTICE
■ If "High Power Consumption Partial Limit On AC/Heater Operation" is frequently shown
Repeated display of this message may indicate a charging system malfunction or deterioration of the battery. Air conditioning or heater operation may be partially restricted because of the increased electrical load.
Have the Toyota RAV4 inspected by your Toyota dealer so the charging system and battery condition can be checked.
If you have a flat tire (vehicles without spare tire) Toyota RAV4 (XA50)
Your Toyota RAV4 is not equipped with a conventional spare tire. Instead, it includes an emergency tire puncture repair kit intended to provide a temporary solution for certain types of minor tread punctures.
A puncture caused by a nail or screw passing through the tire tread may be repaired temporarily with the emergency tire puncture repair kit. The kit contains a bottle of sealant that can be used only once to repair one tire temporarily, without removing the nail or screw from the tread. Depending on the location, size, and severity of the damage, however, the tire may not be repairable with the kit.
After completing a temporary repair, have the damaged tire professionally inspected and repaired or replaced by your Toyota dealer as soon as possible. The emergency repair is not intended to restore the tire for permanent use.
WARNING
■ If you have a flat tire
Do not continue driving with a flat tire.
Driving even a short distance with a flat tire can cause severe damage to both the tire and wheel, potentially making them impossible to repair and increasing the risk of an accident.
Operating the vehicle with a flat tire may create a circumferential groove around the tire sidewall.
If this type of damage has occurred, the tire may rupture or explode when the emergency repair kit is used.
Before repairing the vehicle
- Move the Toyota RAV4 to a safe location with a hard, stable, and level surface, away from moving traffic whenever possible.
- Apply the parking brake securely.
- Shift the shift lever to P.
- Turn off the engine.
- Activate the emergency flashers to warn surrounding drivers.
- For vehicles equipped with a power back door: Turn off the power back door system before accessing the repair kit.
- Inspect the tire carefully and determine the location and extent of the damage before attempting a repair.
The emergency tire puncture repair kit should only be used when the air loss has been caused by a nail or screw passing through the tire tread. Damage to other areas of the tire may require professional recovery and replacement instead.
- Do not remove the nail or screw from the tire. Pulling out the object may enlarge the puncture opening and make a temporary repair with the sealant impossible.
- To reduce the possibility of sealant leaking from the puncture, move the vehicle carefully until the damaged area, if its position is known, is located at the top of the tire.
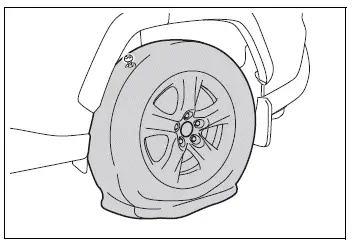
■ A flat tire that cannot be repaired with the emergency tire puncture repair kit
The emergency tire puncture repair kit cannot be used in any of the following situations. Do not attempt an unsuitable repair; contact your Toyota dealer for assistance.
- When the tire has been damaged because the vehicle was driven with insufficient air pressure
- When air pressure was lost because of a crack, cut, or other damage to the tire sidewall
- When the tire has visibly separated from the wheel
- When a cut or damaged area in the tread measures 0.16 in. (4 mm) or more in length
- When the wheel itself is bent, cracked, or otherwise damaged
- When two or more tires have been punctured
- When the damaged tire contains more than one puncture hole or cut
- When the sealant has passed the expiry date shown on its bottle
Location of the emergency tire puncture repair kit, jack and tools
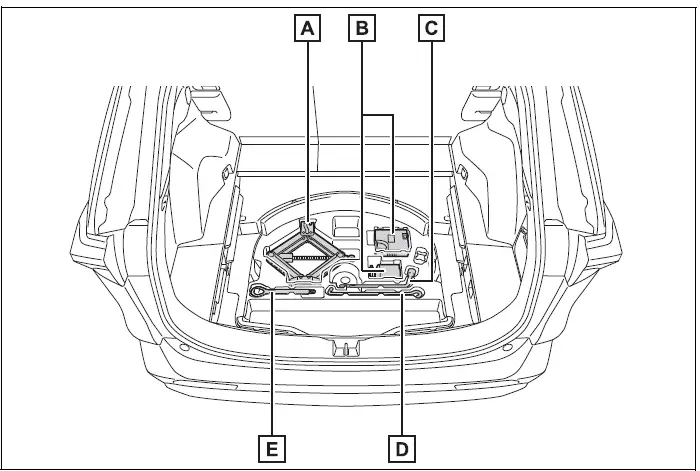
- Jack*1, 2
- Emergency tire puncture repair kit
- Wheel nut wrench
- Jack handle
- Towing eyelet
*1: Taking out the jack
*2: Use of the jack
Emergency tire puncture repair kit components
■ Bottle
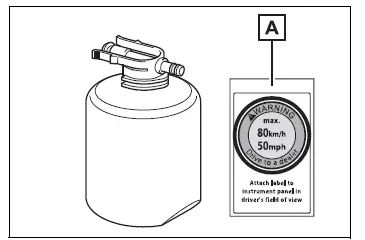
- Sticker
■ Compressor
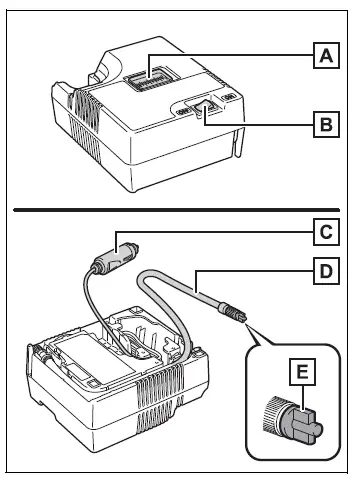
- Air pressure gauge
- Compressor switch
- Power plug
- Hose
- Air release cap
■ Note for checking the emergency tire puncture repair kit
Inspect the expiry date of the sealant periodically so the kit remains ready for emergency use.
The expiry date is printed on the sealant bottle. Never use sealant after this date has passed, as the material may no longer perform correctly and the temporary tire repair may be ineffective.
■ Emergency tire puncture repair kit
- The emergency tire puncture repair kit is designed to inject sealant and air into an eligible damaged tire as part of a temporary repair.
- The sealant has a limited service life, and its expiry date is marked on the bottle. Replace the sealant before that date. Contact your Toyota dealer to obtain a suitable replacement.
- The sealant supplied with the emergency tire puncture repair kit can be used only once and only for the temporary repair of one tire. If the bottle or any other single-use kit component has been used, contact your Toyota dealer for replacement parts.
- The compressor is designed for repeated use when operated according to the instructions.
- The sealant can be used when the outside temperature is between -40ºF (-40ºC) and 140ºF (60ºC).
- The kit is designed exclusively for the size and type of tires originally installed on the Toyota RAV4. Do not use it on tires of a different size or type, and do not use the kit for any purpose other than the one described.
- Sealant that comes into contact with clothing may leave a permanent stain.
- If sealant contacts a wheel or the painted surface of the vehicle body, it may leave a stain that cannot be removed if cleaning is delayed. Wipe the affected area immediately with a wet cloth.
- The compressor produces a loud operating sound while the repair kit is being used.
This noise is normal and does not indicate that the compressor is malfunctioning.
- Do not use the emergency compressor solely to check or adjust routine tire inflation pressure.
WARNING
■ Do not drive the vehicle with a flat tire
Do not continue driving after a tire becomes flat. Even a short distance can severely damage the tire and wheel, leaving them beyond repair and making safe vehicle control more difficult.
Driving with a flat tire may produce a circumferential groove in the sidewall. A tire damaged in this manner may rupture or explode when pressure is applied with the repair kit.
■ Caution while driving
- Store the emergency repair kit securely in its designated location in the luggage compartment.
An unsecured kit could move violently during sudden braking or a collision and cause injury to vehicle occupants.
- The repair kit is intended exclusively for use with your vehicle.
Do not use the Toyota RAV4 repair kit on another vehicle, as incompatibility may prevent a proper repair and could contribute to an accident resulting in death or serious injury.
- Do not use the kit on tires that differ in size or type from the tires originally specified for the vehicle, and do not use it for unrelated purposes. An incomplete or ineffective repair could lead to tire failure and an accident causing death or serious injury.
■ Precautions for use of the sealant
- Swallowing the tire sealant is hazardous to your health. If sealant is ingested, drink as much water as possible and seek medical attention immediately.
- If sealant enters the eyes or comes into contact with the skin, rinse the affected area immediately with clean water. Consult a doctor if irritation or discomfort continues.
Taking out the emergency tire puncture repair kit
1. Open the back door and make sure it remains securely raised while accessing the luggage compartment.
2. Lift and open the deck board to reach the storage area beneath it.
3. Remove the emergency tire puncture repair kit from its designated storage position.
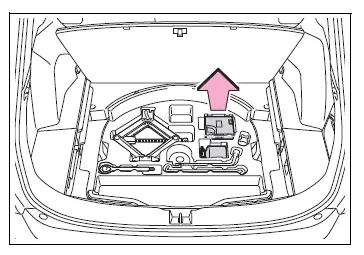
Emergency repair method Toyota RAV4 (XA50)
1. Remove the emergency tire puncture repair kit from the plastic bag and place its components on a clean, stable surface.
Attach the sticker supplied with the sealant bottle in the specified locations so the temporary repair is clearly identified.
(See step 10 for the sticker placement procedure.)
2. Pull the hose and power plug completely out from the underside of the compressor, checking that neither component is twisted or damaged.
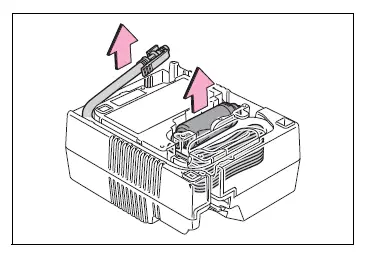
3. Connect the sealant bottle firmly to the compressor.
Press the bottle into position until its retaining claws are fully engaged with the compressor and are no longer visible. Confirm that the bottle is securely attached before continuing.
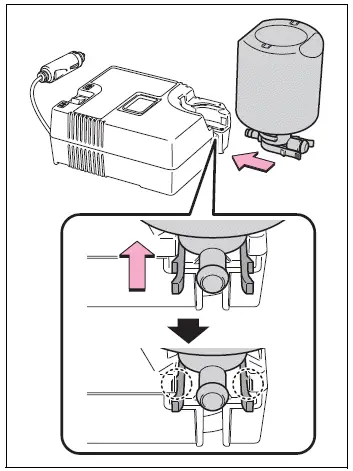
4. Connect the hose to the sealant bottle.
Insert the hose fully until its retaining claw locks securely onto the bottle. A loose connection may prevent the sealant and air from entering the tire correctly.
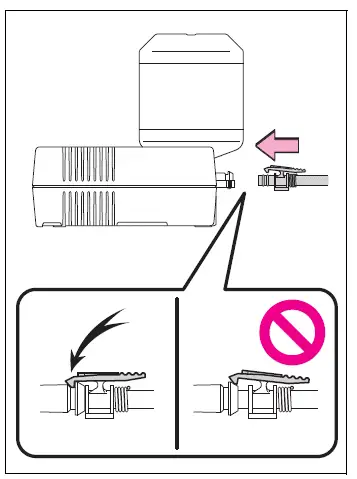
5. Remove the valve cap from the valve stem of the punctured tire and keep it in a safe location for reinstallation later.
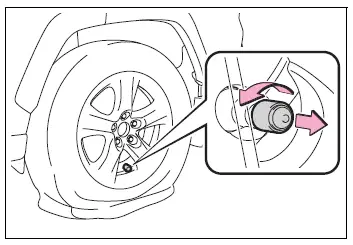
6. Fully extend the hose, and then remove the air release cap from its end.
The air release cap will be required again during the repair procedure.
Store it in a secure place where it cannot be lost while the Toyota RAV4 tire is being repaired.
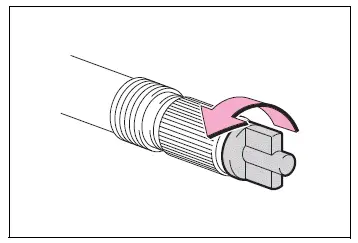
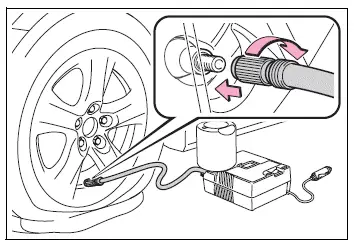
7. Connect the hose securely to the tire valve.
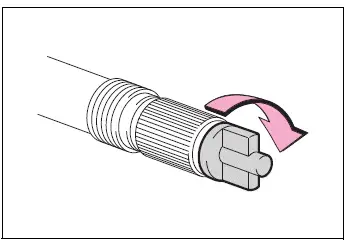
Turn the end of the hose clockwise until it is screwed onto the valve as far as possible. Make sure the connection is firm to minimize air or sealant leakage.
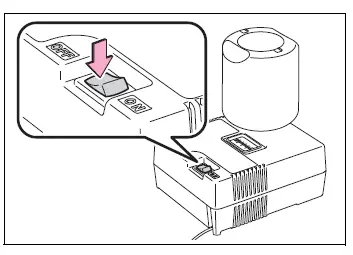
8. Confirm that the compressor switch is in the off position before connecting the unit to the vehicle's electrical supply.
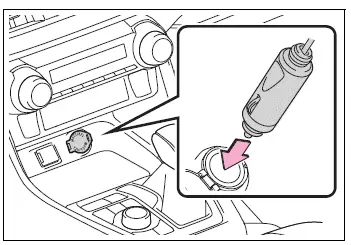
9. Insert the compressor power plug securely into the Toyota RAV4 power outlet socket.
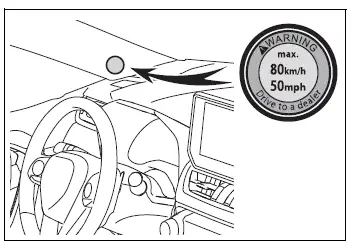
10. Attach the sticker supplied with the emergency tire puncture repair kit in a position that is clearly visible from the driver's seat. The sticker reminds the driver that the tire has received only a temporary repair.
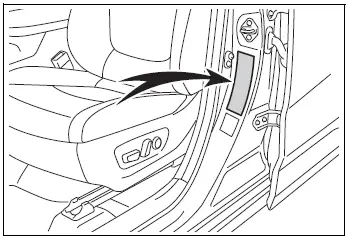
11. Confirm the specified inflation pressure for the damaged tire before operating the compressor.
The correct tire inflation pressure is printed on the label attached to the driver's-side pillar, as shown in the illustration.
12. Start the engine so the compressor can receive the electrical power required for operation.
13. Turn the compressor switch on to begin injecting the sealant and inflating the punctured tire.
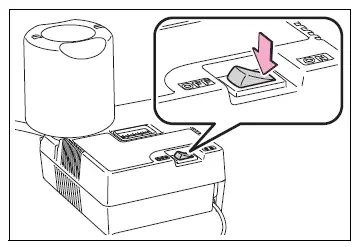
14. Continue operating the compressor until the tire reaches the specified inflation pressure for the Toyota RAV4.
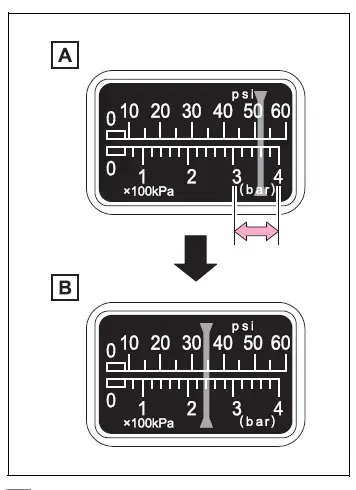
- As the sealant enters the tire, the indicated pressure will initially rise sharply to between 44 psi (300 kPa, 3.0 kgf/cm2 or bar) and 58 psi (400 kPa, 4.0 kgf/cm2 or bar), and will then gradually decrease.
- The pressure gauge will begin displaying the actual tire inflation pressure approximately 1 to 5 minutes after the compressor switch is turned on.
Turn the compressor switch off, and then check the tire inflation pressure shown on the gauge.
Take care not to overinflate the tire. If the pressure remains below the specified level, repeat the inflation process and recheck the gauge until the required tire inflation pressure is reached.
The tire usually requires approximately 5 to 20 minutes to inflate, depending on the outside temperature and operating conditions. If the pressure remains below the specified level after the compressor has operated for 25 minutes, the tire is too severely damaged for a temporary repair. Turn the compressor switch off and contact your Toyota dealer for assistance.
If the tire pressure rises above the specified value, release a small amount of air and adjust the pressure carefully until the correct level is reached.
15. With the compressor switch turned off, disconnect the hose from the tire valve, and then remove the power plug from the Toyota RAV4 power outlet socket.
A small amount of sealant may leak when the hose is disconnected. Remove it carefully and avoid allowing the sealant to contact clothing, the wheel, or the vehicle body.
16. Reinstall the valve cap securely on the valve of the temporarily repaired tire.
17. Attach the air release cap to the end of the hose.
If the air release cap is not installed, sealant may leak from the hose and soil the luggage compartment or other parts of the vehicle.
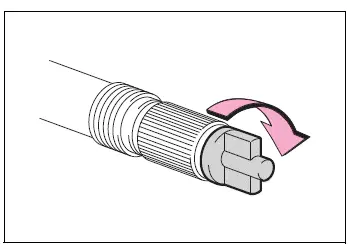
18. Temporarily place the bottle in the luggage compartment while leaving it connected to the compressor. Position the assembled repair kit so it remains secure while the vehicle is moving.
19. To distribute the liquid sealant evenly throughout the tire, begin driving immediately and travel approximately 3 miles (5 km) at a speed below 50 mph (80 km/h). Drive smoothly and remain alert to any unusual vibration or change in vehicle handling.
20. After driving the specified distance, stop the Toyota RAV4 in a safe location on a hard, flat surface and reconnect the emergency tire puncture repair kit.
Remove the air release cap from the hose before reconnecting the hose securely to the tire valve.
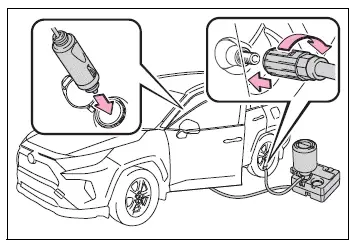
21. Turn the compressor switch on and allow it to operate for several seconds. Turn the switch off, and then check the tire inflation pressure shown on the gauge.
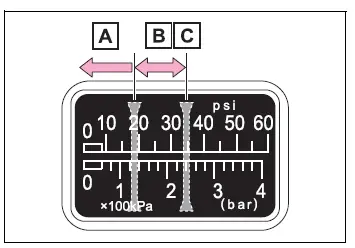
- If the tire inflation pressure is below 19 psi (130 kPa, 1.3 kgf/cm2 or bar), the puncture cannot be repaired safely with the emergency kit. Do not continue driving; contact your Toyota dealer.
- If the tire inflation pressure is 19 psi (130 kPa, 1.3 kgf/cm2 or bar) or higher but remains below the specified pressure, proceed to step 22.
- If the tire has reached the specified inflation pressure, proceed directly to step 23.
22. Turn the compressor switch on and inflate the tire until the specified pressure is reached. Drive the Toyota RAV4 for approximately another 3 miles (5 km), and then repeat the procedure beginning with step 20 to confirm that the repair is holding.
23. Attach the air release cap securely to the end of the hose.
If the cap is not installed correctly, sealant may escape from the hose and stain the vehicle or items stored in the luggage compartment.
24. Store the sealant bottle in the luggage compartment while it remains connected to the compressor. Secure the repair kit so it cannot move around during the journey.
25. Avoid sudden braking, rapid acceleration, and sharp steering movements. Drive carefully at a speed below 50 mph (80 km/h) to the nearest Toyota dealer located within 62 miles (100 km) to have the tire professionally repaired or replaced.
Contact your Toyota dealer for permanent tire repair or replacement and for the correct disposal or replacement of the used emergency tire puncture repair kit components.
When arranging tire service, inform the Toyota dealer that sealant has been injected into the tire. This information is important for the safe handling, inspection, and repair or replacement of the affected tire.
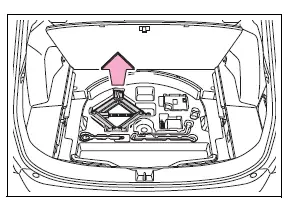
■ Taking out the jack
Remove the jack from its designated storage position in the deck under-tray.
Do not touch the threaded section of the jack because it is coated with grease. Handle the jack by its ungreased surfaces to keep your hands and surrounding trim clean.
■ If the tire is inflated to more than the specified air pressure
1. Disconnect the hose carefully from the tire valve.
2. Attach the air release cap to the end of the hose, and then press the protruding part of the cap against the tire valve to release a small amount of air. Let the air out gradually to avoid reducing the pressure too far.
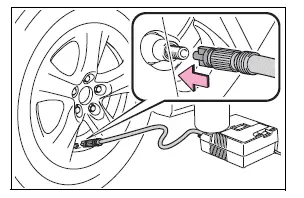
3. Move the hose away from the valve, remove the air release cap from the hose, and then reconnect the hose securely to the tire valve.
4. Turn the compressor switch on and allow it to operate for several seconds. Turn the switch off, and then confirm that the pressure gauge indicates the specified tire inflation pressure.
If the measured pressure is below the specified level, turn the compressor switch on again and repeat the inflation procedure. Continue checking carefully until the correct pressure for the Toyota RAV4 tire is reached.
■ After a tire is repaired with the emergency tire puncture repair kit
- The tire pressure warning valve and transmitter should be replaced after sealant has been used inside the tire.
- Even when the repaired tire has been adjusted to the recommended inflation pressure, the tire pressure warning light may illuminate or flash. Have the Toyota RAV4 inspected when arranging permanent tire repair or replacement.
WARNING
■ When fixing the flat tire
- Stop the vehicle in a safe location on a firm, flat, and stable surface before beginning the repair procedure.
- Do not touch the wheels, brake components, or the surrounding area immediately after the vehicle has been driven.
The wheels and areas around the brakes may remain extremely hot after driving. Contact with these surfaces using your hands, feet, or other parts of the body may cause serious burns.
- With the tire still installed on the vehicle, connect the hose securely to the tire valve. If the connection is loose or incorrectly fitted, air may escape and sealant may be sprayed from the valve area.
- If the hose separates from the valve while the tire is being inflated, it may move suddenly and uncontrollably because of the air pressure inside it.
- After inflation is complete, sealant may splatter when the hose is disconnected or when excess air is released from the tire. Remove the hose carefully and keep your face and body away from the connection.
- Follow every step of the emergency repair procedure in the stated order. If the instructions are not followed correctly, pressurized sealant may spray out unexpectedly.
- Keep a safe distance from the tire while the repair kit is operating because the damaged tire could rupture during inflation.
If you notice cracks, swelling, deformation, or any other unusual change in the tire, turn off the compressor switch immediately and stop the repair procedure.
- The emergency repair kit may overheat during extended operation. Do not operate the compressor continuously for more than 40 minutes.
- Several parts of the repair kit become hot while the compressor is running. Handle the equipment carefully during and after use, and do not touch the metal connection between the sealant bottle and compressor because it may become extremely hot.
- Attach the vehicle speed warning sticker only in the specified location. Never place it over an SRS airbag area, including the steering wheel pad, because the sticker could interfere with proper airbag deployment in the Toyota RAV4.
■ Driving to distribute the liquid sealant evenly
Observe the following precautions while driving to spread the sealant throughout the repaired tire and reduce the risk of an accident.
Failure to follow these instructions may cause a loss of vehicle control, resulting in death or serious injury.
- Drive the Toyota RAV4 carefully at a low, controlled speed. Use particular caution when turning, cornering, or changing direction, as the temporarily repaired tire may affect vehicle handling.
- If the vehicle does not travel in a straight line or you feel a strong pull through the steering wheel, stop immediately in a safe location and check the following conditions.
- Inspect the condition of the repaired tire. The tire may have shifted or separated from the wheel.
- Check the tire inflation pressure. If the pressure is 19 psi (130 kPa, 1.3 kgf/cm2 or bar) or lower, the tire may be severely damaged and unsuitable for continued driving.
NOTICE
■ When performing an emergency repair
- Use the emergency tire puncture repair kit only when the damage was caused by a sharp object, such as a nail or screw, passing through the tire tread.
Do not remove the nail, screw, or other sharp object from the tire before applying the sealant. Removing it may enlarge the puncture and make a successful temporary repair impossible.
- The emergency repair kit is not waterproof.
Protect the compressor and its electrical connections from water, including rain, puddles, and other sources of moisture while the kit is being used.
- Do not place the repair kit directly on dusty, sandy, or dirty ground. If the compressor draws in dust, sand, or debris, its operation may be impaired or a malfunction may occur.
- Keep the repair kit upright with the sealant bottle positioned vertically throughout operation. The kit may not inject the sealant correctly if it is placed on its side.
■ Precautions for the emergency tire puncture repair kit
- Use only a 12 V DC power supply intended for vehicle accessories. Do not connect the Toyota RAV4 repair kit to any other voltage or type of power source.
- Contact with fuel may damage or deteriorate the repair kit.
Handle and store the equipment carefully so gasoline or other fuel cannot splash onto the compressor, bottle, hose, or electrical components.
- Return the repair kit to its designated storage location after use to protect it from dirt, moisture, and accidental damage.
- Store the repair kit securely in the luggage compartment and keep it out of the reach of children.
- Do not disassemble, alter, or attempt to repair the kit yourself. Avoid dropping it or striking components such as the pressure gauge, as an impact may cause inaccurate readings or equipment failure.
■ To avoid damage to the tire pressure warning valves and transmitters
When a tire is treated with liquid sealant, the tire pressure warning valve and transmitter may no longer operate correctly. After using the emergency repair kit, contact your Toyota dealer or another qualified service facility as soon as possible. Inform the technician that sealant was injected into the tire, and make sure the tire pressure warning valve and transmitter are replaced when the tire is permanently repaired or replaced.
If you have a flat tire (vehicles with spare tire) Toyota RAV4 compact crossover
Your Toyota RAV4 is equipped with a spare tire, allowing the damaged wheel and tire assembly to be removed and replaced at the roadside when conditions are safe. Follow the procedures and precautions below carefully to complete the replacement correctly.
WARNING
■ If you have a flat tire
Do not continue driving with a flat tire.
Driving even a short distance with a flat tire can severely damage the tire and wheel beyond repair. It may also affect vehicle stability and lead to an accident.
Before jacking up the vehicle
- Move the Toyota RAV4 to a safe location on a hard, firm, and level surface, as far away from moving traffic as possible.
- Apply the parking brake securely.
- Shift the shift lever to P.
- Turn off the engine.
- Activate the emergency flashers to warn approaching drivers.
- For vehicles with a power back door: Turn off the power back door system to prevent unintended operation while accessing the tools or spare tire.
Location of the spare tire, jack and tools
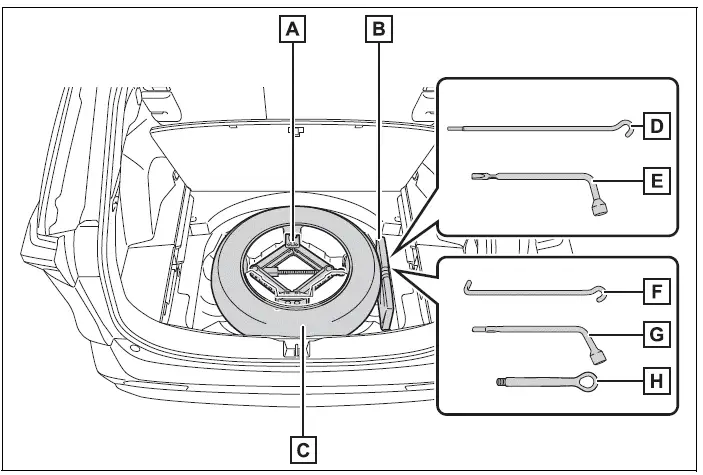
- Jack
- Tool bag
- Spare tire
- Jack handle*1
- Wheel nut wrench*1
- Jack handle*2
- Wheel nut wrench*2
- Towing eyelet*2 (if equipped)
*1: Except for models made in Japan*3
*2: For models made in Japan*3
*3: The country of production is indicated on the Certification Regulation Label.
WARNING
■ Using the tire jack
Observe all of the following precautions whenever the tire jack is used.
Incorrect use of the jack may cause the Toyota RAV4 to fall suddenly, potentially resulting in death or serious injury.
- Do not use the supplied tire jack for any purpose other than replacing a tire or installing and removing tire chains.
- The jack supplied with the vehicle is designed specifically for your Toyota RAV4. Do not use it to raise another vehicle.
- Do not use a jack supplied with another vehicle, as its shape, capacity, or lifting point may not be suitable.
- Position the jack correctly at the designated jack point before raising the vehicle.
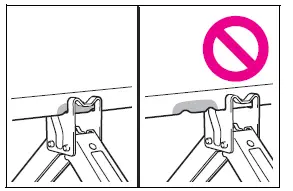
- Never place any part of your body beneath the vehicle while it is supported only by the tire jack.
- Do not start the engine, move the shift lever, or attempt to drive while the vehicle is raised on the jack.
- Do not raise the vehicle while a driver, passenger, or animal remains inside.
- Do not place blocks, spacers, or other objects on top of or underneath the jack while raising the vehicle.
- Raise the vehicle only high enough for the damaged tire to clear the ground and be removed safely.
- Use suitable jack stands whenever it is necessary to work beneath the vehicle. The supplied tire jack alone must not be used to support a person working underneath.
- Stop on firm, flat, and level ground, apply the parking brake fully, and shift the shift lever to P. If necessary, block the wheel diagonally opposite the wheel being replaced to reduce the possibility of vehicle movement.
- Before lowering the vehicle, confirm that no one is standing close to it. Clearly warn nearby people before beginning to lower the jack.
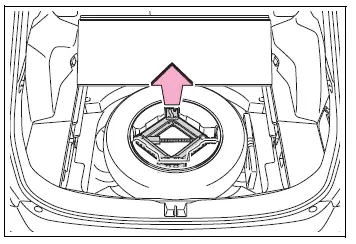
Taking out the jack
1. Open the deck board to access the storage compartment beneath the luggage area floor.
2. Remove the jack carefully from its designated holder.
Do not touch the threaded section of the jack because it is coated with grease. Hold the jack by the clean outer surfaces whenever possible.
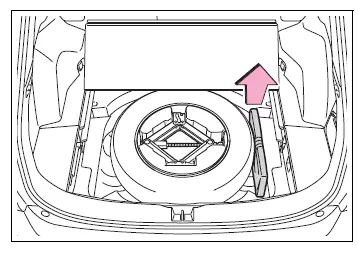
Taking out the tool bag
Remove the tool bag from its designated storage location and place it where the required tools can be reached safely.
Taking out the spare tire
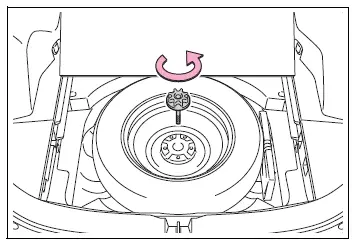
1. Remove the jack holder to gain access to the spare tire retaining fastener.
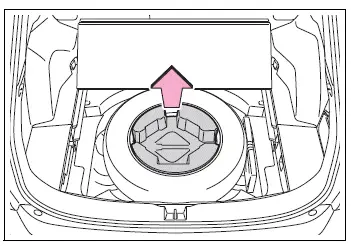
2. Turn and loosen the center fastener that holds the spare tire securely in the storage compartment, and then remove the tire carefully.
WARNING
■ When storing the spare tire
Take care not to trap your fingers, hands, or other body parts between the spare tire and the surrounding vehicle body while removing or reinstalling it.
Replacing a flat tire
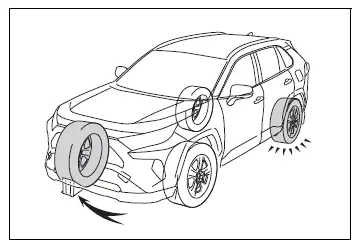
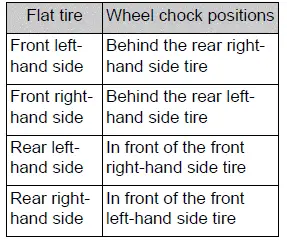
1. Chock the tires as shown to prevent the vehicle from rolling while it is raised. Position the wheel chock against the tire diagonally opposite the flat tire.
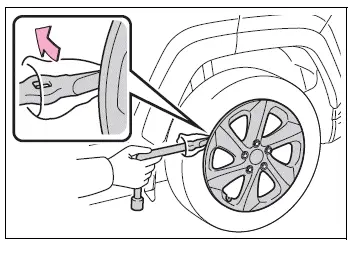
2. For vehicles with a full wheel ornament: Use the wheel nut wrench to remove the ornament carefully.
Wrap the end of the wrench with a clean cloth before prying to help prevent scratches or other damage to the ornament and wheel surface.
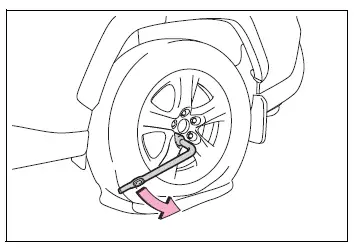
3. Before raising the vehicle, loosen each wheel nut slightly by turning it approximately one full turn. Do not remove the nuts completely at this stage.
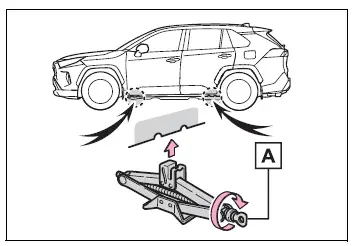
4. Turn jack section A by hand until the jack notch contacts the correct jack point securely.
After removing the jack from its holder, turn section A in the opposite direction as needed to lower the jack, then position and adjust it directly beneath the specified lifting point.
The jack point guides are located beneath the rocker panel and identify the correct positions for safely raising the vehicle.
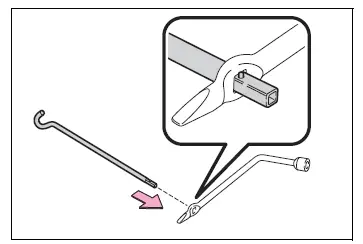
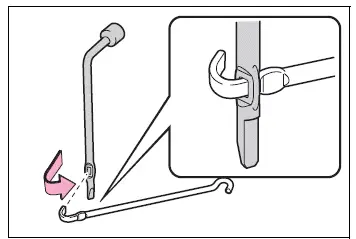
5. Assemble the jack handle and wheel nut wrench in the arrangement shown in the applicable illustration. Confirm that the connected parts are fully engaged before applying force.
Except for models made in Japan*
*: The country of production is indicated on the Certification Regulation Label.
For models made in Japan*
*: The country of production is indicated on the Certification Regulation Label.
6. Raise the vehicle slowly until the flat tire is only slightly clear of the ground. Avoid lifting the vehicle higher than necessary for tire removal.
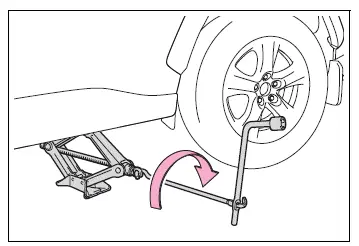
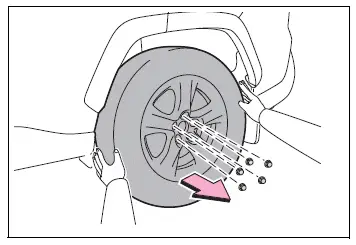
7. Remove all wheel nuts completely, and then pull the flat tire straight away from the wheel hub. Support the tire with both hands because it may be heavy.
When placing the removed tire on the ground, position it with the decorative wheel face upward to reduce the risk of scratching or damaging the visible wheel surface.
WARNING
■ Replacing a flat tire
- Do not touch the wheel discs, brake components, or surrounding areas immediately after the vehicle has been driven.
After driving, the wheels and areas around the brakes may be extremely hot. Touching these surfaces with your hands, feet, or other body parts while replacing a tire may cause serious burns.
- Failure to observe the following precautions may allow the wheel nuts to loosen and the tire to separate from the vehicle, potentially resulting in death or serious injury.
- After replacing a tire, have the wheel nut tightening torque checked as soon as possible.
Wheel nut torque: 76 ft-lbf (103 N-m, 10.5 kgf-m)
- Do not reinstall a wheel ornament that is cracked, distorted, or heavily damaged, as it may detach while the vehicle is moving.
- Use only wheel nuts specifically designed for the wheel being installed. Incorrect nuts may not secure the wheel properly.
- If the wheel bolts, nut threads, or wheel bolt holes show cracks, deformation, or other damage, do not continue the installation. Have the Toyota RAV4 inspected by your Toyota dealer.
- Install every wheel nut with its tapered end facing inward toward the wheel.
- After replacing a tire, have the wheel nut tightening torque checked as soon as possible.
- For vehicles with a power back door: Turn off the power back door system before replacing a tire or handling equipment in the luggage compartment. If the system remains active, accidental contact with a power back door switch may cause the door to move unexpectedly and trap or injure hands and fingers.
Installing the spare tire Toyota RAV4 hybrid
1. Thoroughly remove any dirt, corrosion, or other foreign material from the wheel mounting surface before installing the spare tire.
If debris remains between the wheel and its contact surface, the wheel nuts may gradually loosen while the Toyota RAV4 is moving. This could allow the wheel to detach from the vehicle and create a serious accident risk.
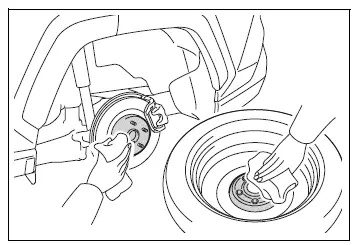
2. Position the spare tire on the wheel hub, and then loosely tighten each wheel nut by hand. Turn the nuts by approximately the same amount so the wheel remains evenly seated.
When replacing a steel wheel with another steel wheel, tighten each nut until the tapered section (A) makes light contact with the disc wheel seat (B). Do not fully tighten the nuts while the vehicle is still raised.
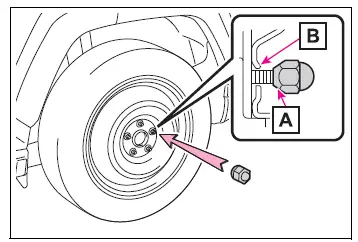
When replacing an aluminum wheel with a steel wheel, tighten the wheel nuts by hand until the tapered section (A) lightly contacts the disc wheel seat (B).
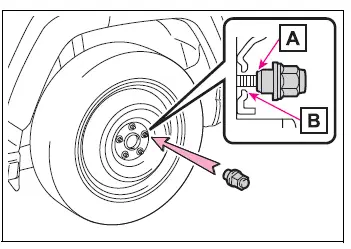
When replacing an aluminum wheel with another aluminum wheel, turn each wheel nut until its washer (A) comes into contact with the disc wheel (B).
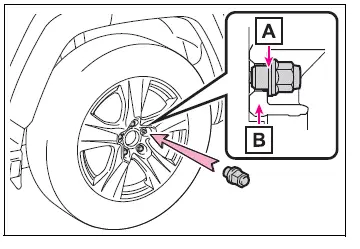
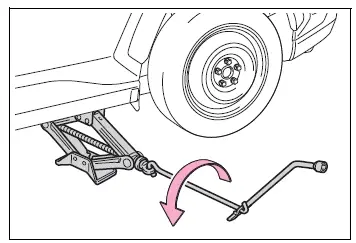
3. Lower the vehicle slowly and carefully until the tire rests fully on the ground. Confirm that no person or object is close to the vehicle while it is being lowered.
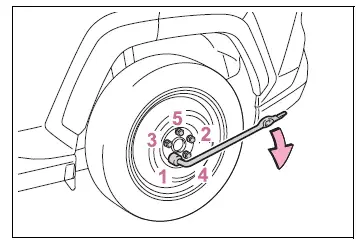
4. Using the wheel nut wrench, tighten the wheel nuts securely in the sequence shown in the illustration. Repeat the tightening sequence two or three times so the wheel is seated evenly and each nut is tightened correctly.
Tightening torque: 76 ft-lbf (103 N-m, 10.5 kgf-m)
5. For vehicles equipped with a full wheel ornament: When reinstalling an original wheel, refit the wheel ornament* after the wheel nuts have been tightened.
Align the cutout in the wheel ornament with the tire valve stem, as shown in the illustration, and make sure the ornament is seated securely.
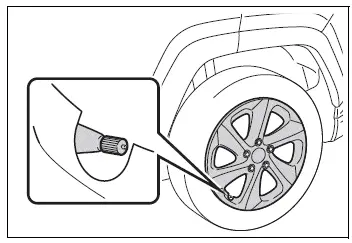
*: The wheel ornament cannot be installed on the compact spare tire.
6. Store the removed flat tire, tire jack, wheel nut wrench, jack handle, and all other tools securely in their designated locations before driving the Toyota RAV4.
■ The compact spare tire
- The compact spare tire can be identified by the words "TEMPORARY USE ONLY" printed on its sidewall.
Use this tire only as a temporary emergency replacement and arrange for the standard tire to be repaired or replaced as soon as possible.
- Check the compact spare tire inflation pressure regularly so it is ready for use when required.
■ When using the compact spare tire
The compact spare tire is not equipped with a tire pressure warning valve and transmitter, if the Toyota RAV4 has a tire pressure warning system. As a result, low pressure in the compact spare will not be detected or reported by that system.
If the compact spare tire is installed after the tire pressure warning light has illuminated, the warning light will remain on because the system is no longer monitoring the removed standard tire correctly.
■ When the compact spare tire is attached
The vehicle may sit lower when the compact spare tire is installed than it does with the standard tires. Allow additional clearance when driving over uneven surfaces, road edges, or raised obstacles.
■ If you have a flat front tire on a road covered with snow or ice
Install the compact spare tire on one of the rear wheel positions rather than directly on the front axle.
Complete the following procedure before fitting tire chains to the front tires:
1. Remove one rear tire and install the compact spare tire in its place.
2. Remove the flat front tire and replace it with the standard tire taken from the rear of the vehicle.
3. Install the tire chains on the front tires according to the applicable instructions.
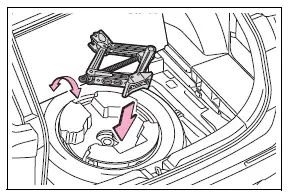
■ When stowing the jack
Before returning the jack to storage, adjust its height so that it fits the shape and dimensions of the jack holder correctly.
The required storage orientation varies according to the jack type. Confirm that the jack is facing the correct direction and is held securely before closing the storage compartment.
Except for models made in Japan*:
For models made in Japan*:
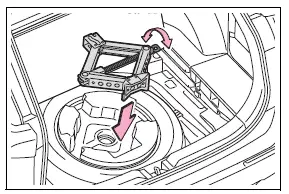
*: The country of production is indicated on the Certification Regulation Label.
WARNING
■ When using the compact spare tire
- The compact spare tire supplied with the vehicle is designed specifically for your Toyota RAV4. Never install it on another vehicle.
- Do not install or use more than one compact spare tire at the same time.
- Replace the compact spare tire with a standard tire as soon as reasonably possible.
- Avoid rapid acceleration, abrupt steering, hard braking, and shift operations that produce sudden engine braking. Drive smoothly because the compact spare may affect vehicle stability and handling.
■ When the compact spare tire is attached
Vehicle speed may not be detected accurately while the compact spare tire is installed. Consequently, the following systems may not operate correctly or may have limited functionality:
- ABS & Brake Assist
- VSC/Trailer Sway Control
- TRAC
- Dynamic radar cruise control with full-speed range
- PCS (Pre-Collision System)
- EPS
- LTA (Lane Tracing Assist)
- Tire pressure warning system (if equipped)
- AHB (Automatic High Beam)
- BSM (if equipped)
- RCTA (if equipped)
- PKSB (if equipped)
- Intuitive parking assist (if equipped)
- Downhill assist control system (if equipped)
- Rear view monitor system (if equipped)
- Panoramic view monitor (if equipped)
- Toyota parking assist monitor (if equipped)
- Navigation system (if equipped)
The following systems may also be unable to provide their full performance and, under some conditions, may place additional stress on drivetrain components:
- Dynamic Torque Control AWD system (if equipped)
- Dynamic Torque Vectoring AWD system (if equipped)
■ Speed limit when using the compact spare tire
Do not exceed 50 mph (80 km/h) while a compact spare tire is installed on the vehicle.
The compact spare tire is not designed for sustained high-speed driving. Exceeding the stated limit may result in tire failure, loss of control, and an accident causing death or serious injury.
■ After using the tools and jack
Before driving, confirm that the jack and every tool are secured in their proper storage locations. Loose equipment may move during sudden braking or a collision and cause injury to vehicle occupants.
NOTICE
■ Be careful when driving over bumps with the compact spare tire installed on the vehicle
The Toyota RAV4 may have reduced ground clearance while fitted with the compact spare tire. Drive slowly and carefully over bumps, uneven pavement, steep entrances, and other raised road surfaces to prevent contact with the underside of the vehicle.
NOTICE
■ Driving with tire chains and the compact spare tire
Do not install tire chains on the compact spare tire.
Tire chains fitted to the compact spare may contact and damage the vehicle body and can adversely affect steering, stability, and overall driving performance.
■ When replacing the tires (vehicles with tire pressure warning system)
When removing or installing wheels, tires, or a tire pressure warning valve and transmitter, contact your Toyota dealer. Incorrect handling may damage the valve or transmitter and prevent the tire pressure warning system from operating properly.
If the engine will not start Toyota RAV4 (XA50)
If the Toyota RAV4 engine does not start even though the correct starting procedure is being followed, remain calm and review each of the possible causes described below. The symptoms shown by the starter motor, lights, and horn can help identify the source of the problem.
The engine will not start even though the starter motor operates normally
One of the following conditions may be preventing the engine from starting:
- There may not be enough fuel in the vehicle's fuel tank.
Refuel the Toyota RAV4, and then attempt to start the engine again using the normal procedure.
- The engine may be flooded.
Wait briefly if necessary, and then try starting the engine again by following the correct starting procedure.
- There may be a malfunction in the engine immobilizer system that prevents the engine from starting normally.
The starter motor turns over slowly, the interior lights and headlights are dim, or the horn does not sound or sounds at a low volume
These symptoms usually indicate an electrical supply problem. One of the following may be the cause:
- The battery may be discharged or may not have enough power to start the engine.
- The battery terminal connections may be loose, dirty, or affected by corrosion.
The starter motor does not turn over (vehicles with smart key system)
The engine starting system may be affected by an electrical problem, such as a depleted electronic key battery or a blown fuse. If the engine switch itself is operating normally, the emergency start procedure described below may be used as a temporary measure.
The starter motor does not turn over, the interior lights and headlights do not turn on, or the horn does not sound
A complete lack of electrical operation may be caused by one of the following conditions:
- The vehicle battery may be fully or severely discharged.
- One or both battery terminals may be disconnected or may not be making proper electrical contact.
Contact your Toyota dealer if the cause cannot be corrected safely, if the Toyota RAV4 still does not start, or if you are unfamiliar with the required inspection or repair procedures.
Emergency start function (vehicles with smart key system)
If the engine does not start, the following steps may be used as a temporary starting method, provided that the engine switch is functioning normally:
1. Pull the parking brake switch and confirm that the parking brake is applied. The parking brake indicator will illuminate.
2. Shift the shift lever securely to P.
3. Turn the engine switch to ACC.
4. Depress the brake pedal firmly, and while keeping it depressed, press and hold the engine switch for approximately 15 seconds.
Even if the engine starts after this procedure, the starting system may still have a malfunction that requires professional diagnosis.
Have the Toyota RAV4 inspected by your Toyota dealer as soon as possible.
If you lose your keys
Your Toyota dealer can make new genuine keys by using the remaining key and the key number stamped on the key number plate.
Keep the key number plate in a secure place, such as your wallet or another protected personal location. Do not store it inside the vehicle, where it could become inaccessible or be used if the vehicle is stolen.
NOTICE
■ When an electronic key is lost (if equipped)
If an electronic key remains missing, the risk of unauthorized access and vehicle theft increases significantly. Visit your Toyota dealer immediately and bring every remaining electronic key originally supplied with your Toyota RAV4 so the necessary security procedures can be completed.
If the electronic key does not operate properly (vehicles with smart key system) Toyota RAV4 compact crossover
If communication between the electronic key and the Toyota RAV4 is interrupted, or if the key cannot be used because its battery is depleted, the smart key system and wireless remote control may become unavailable. In this situation, the doors can still be locked or unlocked and the engine can be started by following the procedures described below.
■ When the electronic key does not work properly
- Confirm that the smart key system has not been disabled through the vehicle customization settings. If the function is turned off, enable it before attempting to use the electronic key again.
- Check whether the electronic key is in battery-saving mode. If this mode is active, cancel it and test the key operation again.
- The electronic key function may have stopped temporarily. Follow the appropriate manual procedure if normal communication with the Toyota RAV4 cannot be restored.
NOTICE
■ In case of a smart key system malfunction, or other key related problems
Take the vehicle and every electronic key originally supplied with it to your Toyota dealer. Providing all available keys will allow the smart key system and related key functions to be inspected correctly.
Locking and unlocking the doors
Remove and use the mechanical key to perform the following door-locking and unlocking operations when the electronic key does not function normally.
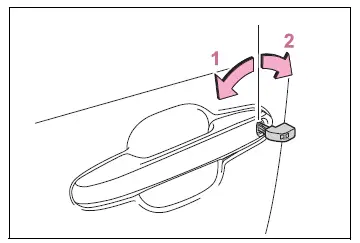
- Locks all the doors
- Unlocks the driver's door
Turn the mechanical key toward the rear of the Toyota RAV4 to unlock the driver's door. To unlock the remaining doors, turn the key in the same direction again within 5 seconds.
■ Key linked functions
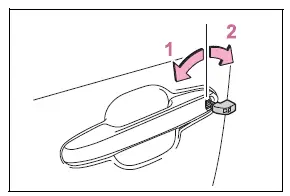
- Closes the windows and the moon roof*1 or panoramic moon roof*1 when the mechanical key is turned and held*2
- Opens the windows and the moon roof*1 or panoramic moon roof*1 when the mechanical key is turned and held*2
*1: If equipped
*2: These functions must be enabled through customization performed by your Toyota dealer.
WARNING
■ When using the mechanical key and operating the power windows or the moon roof (if equipped) or panoramic moon roof (if equipped)
Operate the power windows, moon roof, or panoramic moon roof only after confirming that no passenger has a hand, arm, head, or other body part in a position where it could become trapped. Do not allow children to operate the mechanical key, as they or other passengers could be caught by a closing power window, moon roof, or panoramic moon roof and suffer serious injury.
Starting the engine
1. Confirm that the shift lever is securely positioned in P, and then depress the brake pedal.
2. Touch the side of the electronic key bearing the Toyota emblem directly against the engine switch.
When the Toyota RAV4 detects the electronic key, a buzzer will sound and the engine switch will change to ON.
If the smart key system has been disabled through the vehicle customization settings, the engine switch will change to ACC instead.
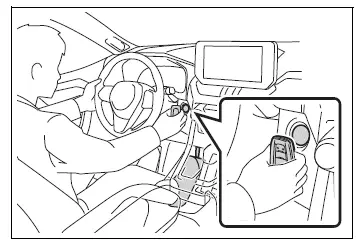
3. Depress the brake pedal firmly and confirm that  is shown on the multi-information display.
4. Press the engine switch briefly but firmly to start the engine.
If the Toyota RAV4 engine still does not start after completing this procedure correctly, contact your Toyota dealer for inspection and assistance.
■ Stopping the engine
Shift the shift lever to P, apply the parking brake securely, and press the engine switch in the same manner normally used to stop the Toyota RAV4 engine.
■ Replacing the key battery
The procedure described above is intended only as a temporary measure when the electronic key battery is depleted. Replace the battery as soon as possible to restore normal smart key system and wireless remote-control operation.
■ Alarm (if equipped) (for Canada)
Locking the doors with the mechanical key will not activate the alarm system.
If a door is unlocked with the mechanical key while the alarm system is already set, the alarm may be triggered. Be prepared to cancel the alarm using the appropriate electronic key procedure.
■ Changing engine switch modes
During step 3 above, release the brake pedal before pressing the engine switch.
The engine will not start while the brake pedal is released. Each press of the engine switch will change the operating mode in sequence, allowing the required Toyota RAV4 power mode to be selected without starting the engine.
If the vehicle battery is discharged Toyota RAV4 fifth generation
The following procedure may be used to start the Toyota RAV4 engine when the vehicle battery is discharged and cannot provide enough power for normal starting.
You may also contact your Toyota dealer or a qualified repair facility for professional assistance, especially if suitable jumper cables or a compatible support vehicle are not available.
Restarting the engine
If you have a suitable set of jumper or booster cables and access to another vehicle equipped with a 12-volt battery, the Toyota RAV4 may be jump-started by carefully following the procedure below.
1. Vehicles with an alarm system: Confirm that you are carrying the electronic key before connecting the jumper cables.
Depending on the circumstances, connecting the jumper or booster cables may activate the alarm and cause the doors to lock. Keep the electronic key with you and do not leave it inside the vehicle.
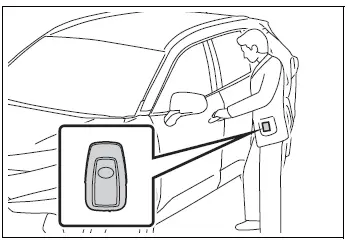
2. Open the hood and make sure it is securely supported before accessing the battery terminals and designated connection point.
3. Connect one positive jumper cable clamp to point A on your vehicle, and connect the clamp at the opposite end of the positive cable to point B on the second vehicle. Next, attach one negative cable clamp to point C on the second vehicle, and connect the remaining negative clamp to point D on your vehicle.
Use jumper cables that are long enough to reach all specified terminals and the designated metallic connection point without being stretched, twisted, or placed near moving components.
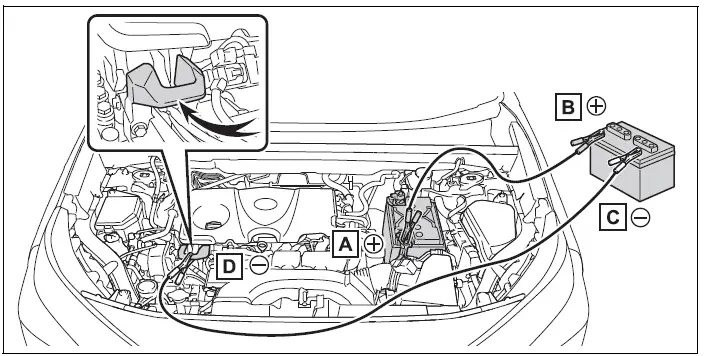
- Positive (+) battery terminal on your vehicle
- Positive (+) battery terminal on the second vehicle
- Negative (-) battery terminal on the second vehicle
- Metallic connection point shown in the illustration
4. Start the engine of the second vehicle. Increase its engine speed slightly and maintain that level for approximately 5 minutes to provide charging current to the discharged battery in your vehicle.
5. Vehicles without smart key system: Keep the engine of the second vehicle operating at the slightly increased speed, and then start the engine of your vehicle using the normal procedure.
Vehicles with smart key system: Maintain the slightly increased engine speed of the second vehicle, turn the engine switch of your vehicle to ON, and start the Toyota RAV4 engine using the normal starting procedure.
6. After the engine has started successfully, disconnect the jumper cables in the exact reverse order from the sequence used when connecting them. Remove each clamp carefully and prevent the clamps from contacting each other or unintended metal surfaces.
Once the engine is running, have the vehicle inspected by your Toyota dealer as soon as possible to determine why the battery became discharged and to confirm that the charging system is operating correctly.
■ Starting the engine when the battery is discharged
The engine cannot be started by pushing or towing the vehicle. Use the specified jump-starting procedure or obtain assistance from your Toyota dealer or a qualified service provider.
■ To prevent battery discharge
- Turn off the headlights, audio system, and other unnecessary electrical equipment whenever the engine is stopped.
Vehicles with Stop & Start system: This precaution does not apply when the engine has been stopped automatically by the Stop & Start system during normal operation.
- Switch off unnecessary electrical components when the Toyota RAV4 is traveling at low speed for an extended period, such as during heavy or slow-moving traffic.
■ When the battery is removed or discharged
- Some information stored in the ECU may be cleared when the battery is removed or becomes fully discharged. After a discharged-battery condition, have the vehicle inspected by your Toyota dealer if normal operation is not restored.
- Certain vehicle systems may require initialization before they can operate normally again.
■ When removing the battery terminals
Removing the battery terminals clears certain information stored in the ECU and may affect the operation or settings of some vehicle systems. Before disconnecting either battery terminal, contact your Toyota dealer for guidance and any required precautions.
■ Charging the battery
The electrical energy stored in the battery gradually decreases even when the Toyota RAV4 is not being driven. This occurs through natural self-discharge and the continuous power consumption of certain electrical components.
If the vehicle remains unused for an extended period, the battery may become discharged and may no longer provide enough power to start the engine. Under normal conditions, the battery is recharged automatically while the vehicle is being driven.
■ When recharging or replacing the battery (vehicles without smart key start system)
After the battery has been recharged or replaced, the engine may not start during the first attempt. Try starting it again using the normal procedure. If it starts on the second attempt, this condition does not indicate a malfunction.
■ When recharging or replacing the battery (vehicles with smart key system)
- When the vehicle battery is discharged, the doors may not unlock through the smart key system. Use the wireless remote control if it remains available, or unlock and lock the doors with the mechanical key.
- After the battery has been recharged or replaced, the Toyota RAV4 engine may not start on the first attempt but should start normally on the second attempt. This behavior is not considered a malfunction.
- The vehicle memorizes the current engine switch mode. When the battery is reconnected, the system returns to the operating mode that was selected before the battery became discharged.
Turn the engine switch to OFF before disconnecting the battery to reduce the possibility of an unexpected operating mode when power is restored.
If you do not know which engine switch mode was active before the battery discharged, reconnect the battery carefully and confirm the vehicle status before operating any controls.
■ When the battery is removed or discharged (vehicles with Stop & Start system)
After the battery has been removed, discharged, or reconnected, the Stop & Start system may not automatically stop the engine for up to approximately one hour while normal operation is being restored.
■ When replacing the battery
- Vehicles with Stop & Start system:
Install a genuine battery designed specifically for the Stop & Start system, or use a battery with specifications equivalent to those of the genuine battery. If an unsupported battery is installed, Stop & Start functions may be limited in order to protect the battery and related electrical systems.
An unsuitable battery may also provide reduced performance and may prevent the engine from restarting correctly. Contact your Toyota dealer for information about a compatible replacement battery for your Toyota RAV4.
- Use a replacement battery that complies with the applicable European regulations.
Type A:
Use a battery with the same case size as the previous battery (LN3), a 20-hour rate capacity (20HR) of 65Ah or greater, and a cold cranking performance rating (CCA) of 603A or greater.
Type B:
Use a battery with the same case size as the previous battery (LN2), a 20-hour rate capacity (20HR) of 60Ah or greater, and a cold cranking performance rating (CCA) of 360A or greater.
Type C:
Use a battery with the same case size as the previous battery (LN2), a 20-hour rate capacity (20HR) of 60Ah or greater, and a cold cranking performance rating (CCA) of 563A or greater.
- If the replacement battery has different external dimensions, it may not fit the battery tray correctly or may be impossible to secure safely in the Toyota RAV4.
- If the 20-hour rate capacity is lower than specified, the battery may discharge even when the vehicle remains unused for only a relatively short period, and the engine may subsequently fail to start.
For additional information about battery service, replacement requirements, or compatible components for your Toyota RAV4, consult your Toyota dealer.
WARNING
■ When removing the battery terminals
Always disconnect the negative (-) terminal before removing the positive (+) terminal. If a tool or the positive terminal contacts nearby metal while the positive connection is being removed, a spark may be produced. This can cause a fire, electric shock, serious injury, or death.
■ Avoiding battery fires or explosions
Observe the following precautions to avoid accidentally igniting the flammable gas that may be released from the battery:
- Confirm that every jumper cable clamp is attached to the correct terminal or designated connection point. Make sure each clamp contacts only its intended location.
- Do not allow the free end of the jumper cable connected to the positive (+) terminal to touch brackets, unpainted metal, or any other component in the surrounding area.
- Never allow the positive (+) and negative (-) jumper cable clamps to touch each other while either cable is connected.
■ Battery precautions
The battery contains poisonous and corrosive acidic electrolyte, and battery-related components contain lead and lead compounds. Observe all of the following precautions whenever handling or working near the Toyota RAV4 battery:
- Wear suitable safety glasses when working with the battery. Prevent battery electrolyte from contacting your skin, eyes, clothing, painted surfaces, or other parts of the vehicle body.
- Do not lean over the battery, particularly while connecting cables, charging it, or starting the engine.
- If battery fluid contacts your skin or eyes, immediately rinse the affected area thoroughly with clean water and seek medical attention.
Place a clean wet sponge or cloth over the affected area and keep it there until medical assistance is available.
- Wash your hands thoroughly after touching the battery support, terminals, cables, or any other battery-related components.
- Keep children away from the battery, jumper cables, and the surrounding work area.
■ When replacing the battery
Contact your Toyota dealer for information about selecting and installing a suitable replacement battery. Using the correct battery helps maintain reliable starting and proper electrical operation of the Toyota RAV4.
NOTICE
■ When handling jumper cables
Route and hold the jumper cables carefully so they cannot become caught in the cooling fan, engine drive belt, or any other moving component. Check the cable positions before either engine is started.
■ When connecting jumper cables
Connect the jumper cables only to the specified battery terminals and designated metallic connection point. Incorrect connections may interfere with electronic equipment, damage electrical components, or prevent the Toyota RAV4 from being started safely.
If your Toyota RAV4 overheats Toyota RAV4 (XA50)
One or more of the following symptoms may indicate that your Toyota RAV4 is overheating and requires immediate attention:
- The engine coolant temperature gauge enters the red zone, or the engine loses power. For example, the vehicle may not accelerate even when the accelerator pedal is pressed.
- The message "Engine Coolant Temp High Stop in a Safe Place See Owner's Manual" appears on the multi-information display.
- Steam is coming from underneath the hood.
Correction procedures
1. Stop the vehicle in a safe location away from traffic. Turn off the air conditioning system, and then stop the engine.
2. If steam is visible, do not open the hood immediately. Wait until the steam has completely subsided, and then carefully lift the hood.
If no steam is visible, carefully lift the hood while remaining alert for escaping heat or hot coolant.
3. After the engine has cooled sufficiently, inspect the radiator hoses and radiator core for visible leaks, cracks, or other signs of coolant loss.
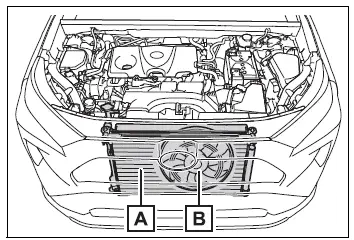
- Radiator
- Cooling fan
If a large amount of coolant is leaking, do not continue operating the Toyota RAV4. Contact your Toyota dealer immediately.
4. Check the coolant reservoir. The coolant level is satisfactory when it is between the "FULL" and "LOW" lines marked on the reservoir.
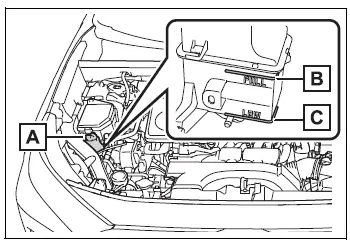
- Reservoir
- "FULL" line
- "LOW" line
5. If the coolant level is below the required range, add coolant as necessary.
If the correct coolant is unavailable during an emergency, water may be used temporarily so that the immediate situation can be addressed.
If water was added in an emergency, have the vehicle inspected by your Toyota dealer as soon as possible. The cooling system should be checked and serviced appropriately rather than relying on water as a permanent substitute.
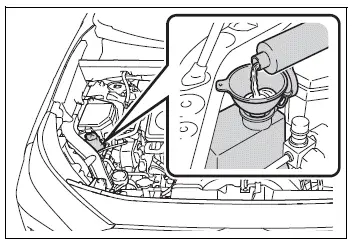
6. Start the engine and switch on the air conditioning system. Check whether the radiator cooling fan operates, and inspect the radiator and hoses again for coolant leaks.
When the air conditioning system is switched on immediately after a cold start, the cooling fan operates. Confirm fan operation by listening for the fan and checking for airflow. If operation is difficult to verify, switch the air conditioning system on and off several times while observing the fan. The fan may not operate in freezing temperatures.
7. If the cooling fan is not operating, stop the engine immediately and contact your Toyota dealer. Do not continue driving, as the engine may overheat again.
If the cooling fan is operating, have the Toyota RAV4 inspected at the nearest Toyota dealer to determine the cause of the overheating condition.
8. Check whether the message "Engine Coolant Temp High Stop in a Safe Place See Owner's Manual" remains displayed on the multi-information display.
If the message does not disappear, stop the engine and contact your Toyota dealer. Continuing to operate the vehicle while the warning remains displayed may result in engine damage.
If the message is no longer displayed, have the vehicle inspected at the nearest Toyota dealer to confirm that the cooling system is functioning correctly and that the original cause of the overheating has been resolved.
WARNING
■ When inspecting under the hood of your vehicle
Observe the following precautions whenever inspecting the engine compartment after an overheating event.
Failure to follow these precautions may result in serious injury, including severe burns.
- If steam is coming from underneath the hood, do not open the hood until the steam has completely subsided.
The engine compartment may be extremely hot, and opening the hood too soon may expose you to escaping steam or hot coolant.
- Keep your hands, loose clothing, and accessories, especially ties, scarves, and mufflers, away from the cooling fan and drive belts.
The fan may begin operating unexpectedly. Hands or clothing could become caught in moving components and cause serious injury.
- Do not loosen or remove the coolant reservoir cap while the engine and radiator are hot. Pressurized steam or high-temperature coolant may spray out and cause severe burns.
NOTICE
■ When adding engine coolant
Wait until the engine has cooled sufficiently, and then add coolant slowly and carefully.
Adding cold coolant too quickly while the engine is still hot can subject engine components to a sudden temperature change and may cause damage.
■ To prevent damage to the cooling system
Observe the following precautions when checking or replenishing the coolant:
- Prevent foreign matter, including sand, dust, or other debris, from entering or contaminating the coolant.
- Do not mix any coolant additive into the cooling system.
If your Toyota RAV4 becomes stuck Toyota RAV4 compact crossover
Follow the procedures below if the tires spin without gaining traction or if the Toyota RAV4 becomes stuck in mud, loose dirt, sand, or snow:
Recovery procedure
1. Stop the engine, firmly apply the parking brake, and shift the shift lever to P.
2. Clear away any mud, snow, sand, or loose material from around the tire that is stuck. Removing as much material as possible can help the tire regain contact with a firmer surface.
3. Place wood, stones, or another suitable material beneath the tires to improve traction. Position the material carefully so that it remains stable when the vehicle begins to move.
4. Restart the engine.
5. Shift the shift lever to D or R, depending on the direction in which the vehicle needs to move, and release the parking brake. While carefully checking the surrounding area, gently depress the accelerator pedal and attempt to move the Toyota RAV4 onto firm ground.
■ When it is difficult to free the vehicle
Press  to turn off TRAC. Disabling TRAC may allow the wheels to spin as needed when attempting to free the vehicle.
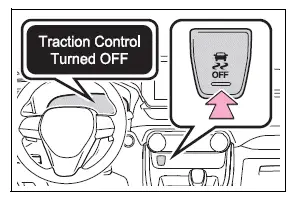
WARNING
■ When attempting to free a stuck vehicle
If you move the vehicle backward and forward to free it, first make sure the surrounding area is clear of people, other vehicles, and nearby objects. The vehicle may suddenly surge forward or backward when the tires regain traction and the vehicle breaks free.
Use extreme caution and maintain full control of the vehicle throughout the recovery attempt.
■ When shifting the shift lever
Do not shift the shift lever while the accelerator pedal is depressed.
Doing so may cause the Toyota RAV4 to accelerate suddenly and unexpectedly, potentially resulting in an accident, death, or serious injury.
NOTICE
■ To avoid damaging the transmission and other components
- Avoid excessive wheel spinning, and do not depress the accelerator pedal more than necessary. Prolonged or aggressive attempts to free the vehicle may place unnecessary stress on the transmission and related components.
- If the vehicle remains stuck after these procedures have been completed, further attempts may be ineffective and the vehicle may need to be freed by towing.