 Toyota Yaris: If you have a flat tire
1. Reduce your speed gradually, keeping a straight line. Move cautiously off the road to a safe place well away from the traffic. Avoid stopping on the center divider of a highway. Park on a level spot with firm ground.
2. Stop the engine and turn on your emergency flashers.
3. Firmly set the parking brake and put the transmission in “P” (automatic) or reverse (manual).
4. Have everyone get out of the vehicle on the side away from traffic.
5. Read the following instructions thoroughly.
CAUTION.
When jacking, be sure to observe the following to reduce the possibility of personal injury: Follow jacking instructions.
Do not put any part of your body under the vehicle supported by the jack. Otherwise, personal injury may occur.
Do not start or run the engine while your vehicle is supported by the jack.
Stop the vehicle on a level firm ground, firmly set the parking brake and put the transmission in “P” (automatic) or reverse (manual). Block the wheel diagonally opposite to the one being changed if necessary.
Make sure to set the jack properly in the jack point. Raising the vehicle with jack improperly positioned will damage the vehicle or may allow the vehicle to fall off the jack and cause personal injury.
Never get under the vehicle when the vehicle is supported by the jack alone.
Use the jack only for lifting your vehicle during wheel changing.
Do not raise the vehicle with someone in the vehicle.
When raising the vehicle, do not put an object on or under the jack.
Raise the vehicle only high enough to remove and change the tire.
NOTICE.
Do not continue driving with a deflated tire. Driving even a short distance can damage a tire and wheel beyond repair.
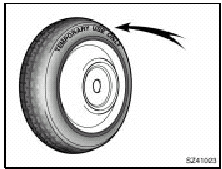
Compact spare tire
The compact spare tire is designed for temporary emergency use only.
The compact spare tire is identified by the distinctive wording “TEMPORARY USE ONLY” molded into the sidewall of the tire.
The compact spare tire saves space in your luggage compartment, and its lighter weight helps to improve fuel economy and permits easier installation in case of a flat tire.
The compact spare tire can be used many times, if necessary. It has tread life of up to 4800 km (3000 miles) depending on road conditions and your driving habits. When tread wear indicators appear on the tire, replace the tire.
CAUTION.
The compact spare tire was designed especially for your Toyota.
Do not use it on any other vehicle.
Do not use more than one compact spare tire at the same time.
The pressure for the compact spare tire must be 420 kpa (4.2 kgf/cm2 or bar, 60 psi).
Do not exceed 80 km/h (50 mph) when driving with the compact spare tire.
Replace the compact spare tire with the standard tire as soon as possible.
Avoid sudden acceleration, sudden deceleration and sharp turns with the compact spare tire.
NOTICE.
Your ground clearance is reduced when the compact spare tire is installed so avoid driving over obstacles and drive slowly on rough, unpaved roads and speed bumps. Also, do not attempt to go through an automatic car wash as the vehicle may get caught, resulting in damage.
—Required tools and spare tire
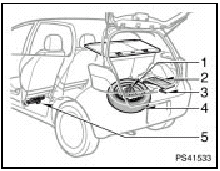
1. Get the required tools and spare tire.
1. Tie-down belt.
2. Tool bag.
3. Jack handle.
4. Spare tire.
5. Jack.
Split seat only—Before removing the deck board, slide the rear seat fully forward.
To remove the deck board, see “Luggage storage box”.
You will find a wheel nut wrench in the tool bag.
To prepare yourself for an emergency, you should familiarize yourself with the use of the jack, each of the tools and their storage locations.
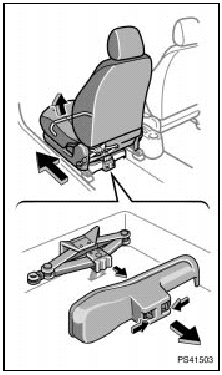
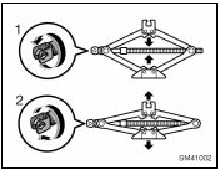
To remove the jack, move the driver seat to the front-most position and remove the cover.
To remove: Turn the joint in direction 1 by hand until the jack is free.
To store: Turn the joint in direction 2 by hand until the jack is firmly secured to prevent it flying forward during a collision or sudden braking.
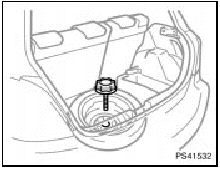
To remove the spare tire, loosen the bolt and remove it.
Then take the spare tire out of the vehicle.
When storing the spare tire, put it in place with the inner side of the wheel facing up. Then secure the tire by repeating the above removal steps in reverse order to prevent it from flying forward during a collision or sudden braking.
The compact tire storage area is designed only for a compact spare tire.
Standard size tire cannot be stored in this storage area.
—Blocking the wheel
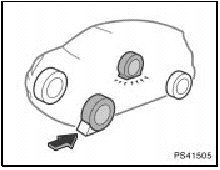
2. Block the wheel diagonally opposite the flat tire to keep the vehicle from rolling when it is jacked up.
When blocking the wheel, place a wheel block in front of one of the front wheels or behind one of the rear wheels.
—Removing wheel ornament (on some models)
Steel wheels (type A)

Steel wheels (type B)
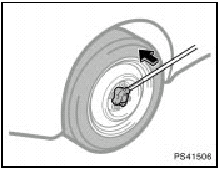
3. Remove the wheel ornament.
Pry off the wheel ornament, using the beveled end of the wheel nut wrench as shown.
CAUTION.
Do not try to pull off the ornament by hand. Take due care in handling the ornament to avoid unexpected personal injury.
—Loosening wheel nuts
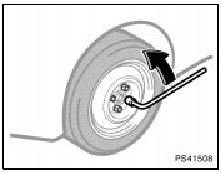
4. Loosen all the wheel nuts.
Always loosen the wheel nuts before raising the vehicle.
The nuts turn counterclockwise to loosen. To get maximum leverage, fit the wrench to the nut so that the handle is on the right side, as shown above. Grasp the wrench near the end of the handle and pull up on the handle. Be careful that the wrench does not slip off the nut.
Do not remove the nuts yet—just unscrew them about one-half turn.
CAUTION.
Never use oil or grease on the bolts or nuts. The nuts may loosen and the wheels may fall off, which could cause a serious accident.
—Positioning the jack
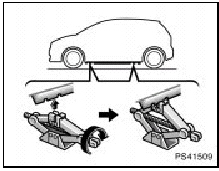
5. Position the jack at the correct jack point as shown.
Make sure the jack is positioned on a level and solid place.
—Raising your vehicle
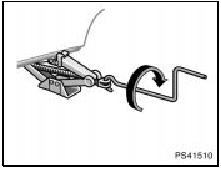
6. After making sure that no one is in the vehicle, raise it high enough so that the spare tire can be installed.
Remember you will need more ground clearance when putting on the spare tire than when removing the flat tire.
To raise the vehicle, insert the jack handle into the jack (it is a loose fit) and turn it clockwise. As the jack touches the vehicle and begins to lift, double-check that it is properly positioned.
CAUTION.
Never get under the vehicle when the vehicle is supported by the jack alone.
—Changing wheels
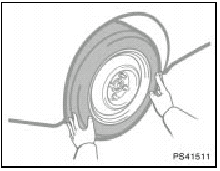
7. Remove the wheel nuts and change tires.
Lift the flat tire straight off and put it aside.
Roll the spare wheel into position and align the holes in the wheel with the bolts. Then lift up the wheel and get at least the top bolt started through its hole. Wiggle the tire and press it back over the other bolts.
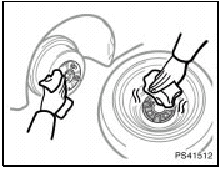
Before putting on wheels, remove any corrosion on the mounting surfaces with a wire brush or such. Installation of wheels without good metal-to-metal contact at the mounting surface can cause wheel nuts to loosen and eventually cause a wheel to come off while driving.
—Reinstalling wheel nuts
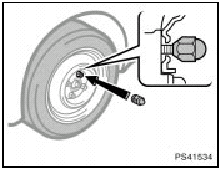
8. Reinstall all the wheel nuts finger tight.
Reinstall the wheel nuts (tapered end inward) and tighten them as much as you can by hand. Press back on the tire and see if you can tighten them more.
CAUTION.
Never use oil or grease on the bolts or nuts. Doing so may lead to overtightening the nuts and damaging the bolts. The nuts may loosen and the wheels may fall off, which could cause a serious accident. If there is oil or grease on any bolt or nut, clean it.
—Lowering your vehicle
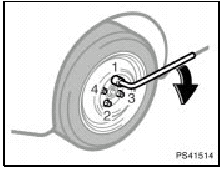
9. Lower the vehicle completely and tighten the wheel nuts.
Turn the jack handle counterclockwise to lower the vehicle.
Use only the wheel nut wrench to tighten the nuts. Do not use other tools or any additional leverage other than your hands, such as a hammer, pipe or your foot. Make sure the wrench is securely engaged over the nut.
Tighten each nut a little at a time in the order shown. Repeat the process until all the nuts are tight.
CAUTION.
When lowering the vehicle, make sure all portions of your body and all other persons around will not be injured as the vehicle is lowered to the ground.
Have the wheel nuts tightened with torque wrench to 103 N·m (10.5 kgf·m, 76 ft·lbf), as soon as possible after changing wheels. Otherwise, the nuts may loosen and the wheels may fall off, which could cause a serious accident.
Do not attach a heavily damaged plastic wheel ornament.
It may fly off the wheel and cause accidents while the vehicle is moving.
—Stowing flat tire
10.Restow all the tools and jack securely.
Then secure the flat tire with the tire tie-down belt in the luggage compartment as follows.
Before stowing flat tire, remove the luggage cover. (See “Luggage cover”).
CAUTION.
Before driving, make sure all the tools, jack and flat tire are securely in place in their storage location to reduce the possibility of personal injury during a collision or sudden braking.
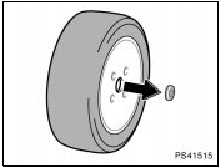
1. Aluminum wheels—Before stowing the flat tire, remove the center wheel ornament by pushing from the reverse side.
Be careful not to lose the wheel ornament.
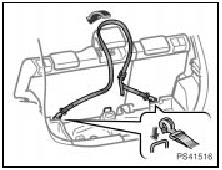
2. Hook each belt end to the corresponding anchor brackets. Then, put the center portion of the belt onto the rear center head restraint.
3. Return the deck board to the original position and then lock it. (See “Luggage storage box”).
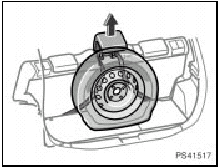
4. Lay the flat tire on the luggage floor so that the outer side of the tire wheel faces toward the rear of the vehicle. Detach the rear center head restraint from the seat and release the belt.
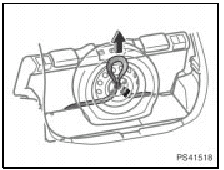
5. Pass the belt through the center hole of the flat tire wheel.
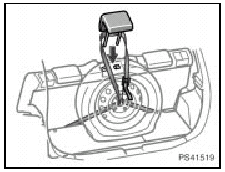
6. Put the center portion of the belt onto the rear center head restraint position and then return the rear center head restraint.
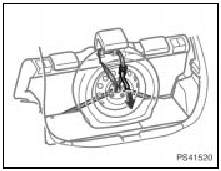
7. Hold the buckle and pull the belt to secure the tire.
After stowing the flat tire, check that the tire and belt are secured.
—After changing wheels
11.Check the air pressure of the replaced tire.
Adjust the air pressure to the specification designated. If the pressure is lower, drive slowly to the nearest service station and fill to the correct pressure.
Do not forget to reinstall the tire inflation valve cap as dirt and moisture could get into the valve core and possibly cause air leakage. If the cap is missing, have a new one put on as soon as possible.
As soon after changing wheels as possible, tighten the wheel nuts to the torque specified with a torque wrench. And have a technician repair the flat tire.
CAUTION.
Before driving, make sure all the tools, jack and flat tire are securely in place in their storage location to reduce the possibility of personal injury during a collision or sudden braking.
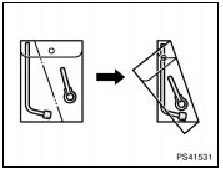
Position the tools as shown in the illustration.
Fold the tool bag over and then restow it.
 If your vehicle overheats
If your engine coolant temperature gauge indicates overheating, if you experience
a loss of power, or if you hear a loud knocking or pinging noise, the engine has
probably overheated. You should f ...
 If your vehicle becomes stuck
If your vehicle becomes stuck in snow, mud, sand, etc., then you may attempt
to rock the vehicle free by moving it forward and backward.
CAUTION.
Do not attempt to rock the vehicle free by movin ...
See also:
Keys (without engine immobilizer system)
With wireless remote control
Without wireless remote control
These keys work in every lock.
Since the side doors and back door can be locked without a key, you should always
carry a spa ...
Turn signal lever
The turn signal lever can be used to show the following intentions of the driver:
Right turn
Left turn
Lane change to the right (push and
hold the lever partway)
The right hand signals will ...
Correct driving posture
Drive with a good posture as follows:
Sit upright and well back in the seat. (→P. 43)
Adjust the position of the seat forward or backward to ensure the pedals can be reached and easily de ...
